After years of experimenting at backyard cookouts and learning from more than a few mistakes, I can tell you that nailing the perfect steak is about understanding one thing: your target internal temperature. When I finally started using a digital meat thermometer consistently, my grilling results transformed overnight. No more guessing, no more cutting into a steak to find it raw in the center or dried out from overcooking. This guide covers everything you need to confidently grill steak to rare, medium-rare, medium, and beyond, every single time.
Table of Contents
Best Steak Cuts for Grilling
Not all steaks grill equally well. Some cuts have the marbling that creates incredible flavor when they hit high heat, while others will toughen up no matter how carefully you cook them.
Ribeye is my top recommendation for grilling. The fat marbling throughout the meat melts as it cooks, basting the steak from within and creating that rich, beefy flavor people pay premium prices for at steakhouses. A 1 to 1.5-inch thick ribeye is forgiving enough for beginners while impressive enough to satisfy experienced grillers.
T-bone and Porterhouse steaks offer two cuts in one. The T-bone combines strip steak on one side of the bone with tenderloin on the other. This gives you the robust flavor of the strip alongside the buttery tenderness of the tenderloin. The bone also helps conduct heat, cooking the meat more evenly.
Strip steak (also called New York strip) grills beautifully and holds up well to high heat. It has less marbling than ribeye but enough fat to stay juicy when cooked to medium-rare. Many backyard grillers prefer it because it is easier to find consistently at grocery stores.
For thicker cuts over 1.5 inches, consider the reverse sear method we cover later in this guide. This technique gives you more control over the final temperature and produces an exceptionally even cook from edge to edge.
Preparing Your Steak
Great grilling starts before you even light the flames. How you prepare your steak matters just as much as how you cook it.
Bring it to room temperature. I take my steak out of the refrigerator 30 to 45 minutes before grilling. A cold steak will not cook evenly, leaving you with a cold center that never reaches the right internal temperature while the outside overcooks. This simple step alone improves results dramatically.
Season simply but generously. Kosher salt and freshly cracked black pepper are all you really need for a quality cut. I season with about 1 teaspoon of kosher salt per pound, pressing it into both sides. The salt draws out moisture, which then dissolves the proteins and gets reabsorbed, resulting in better flavor and texture. For extra depth, you can add garlic powder or a simple dry rub, but never overpower a beautiful piece of beef.
Pat the steak dry. Excess moisture on the surface creates steam instead of a crust. After patting dry, I let the seasoned steak sit uncovered on a rack in the refrigerator for up to 24 hours. This air-drying method, sometimes called a dry brine, produces an incredibly crispy, deeply flavored crust that stands up to anything you will find at a restaurant.
Setting Up Your Grill
The difference between a good steak and a great one often comes down to grill setup. Understanding heat zones gives you control that direct heat alone cannot provide.
Two-zone cooking is essential. I always set up my grill with a hot zone on one side and a cooler zone on the other. For gas grills, I turn one burner to high and leave the others off or on low. For charcoal grills, I pile the coals on one side, leaving the other side empty. This setup lets you sear your steak over high direct heat, then move it to the cooler side to finish cooking without burning the exterior.
Preheat properly. I let my gas grill run for 10 to 15 minutes with the lid closed before placing any meat on the grates. A properly preheated grill reaches temperatures above 500F at the surface, which is what you need for that restaurant-quality sear. The grates should be hot enough that a drop of water bounces and evaporates immediately.
Gas versus charcoal. Both produce excellent results when used correctly. Charcoal provides a more intense, direct heat that many experienced grillers prefer for the flavor compounds it adds. Gas offers superior temperature control and convenience. For the exact same doneness level, the grilling time remains nearly identical on both types. Choose based on your preference and stick with it until you understand how your specific grill behaves.
Doneness Levels and Temperature Chart
Understanding steak doneness comes down to internal temperature. As meat heats, the proteins denature in a predictable sequence, changing texture, color, and moisture retention at specific temperatures.
The carryover cooking principle is critical. When you pull a steak from the grill, it continues cooking for several minutes as residual heat moves inward. This means you should remove the steak 5 to 10 degrees below your target temperature. A steak pulled at 125F will climb to approximately 135F during a 10-minute rest, landing perfectly in the medium-rare range.
Here is the complete steak doneness temperature guide:
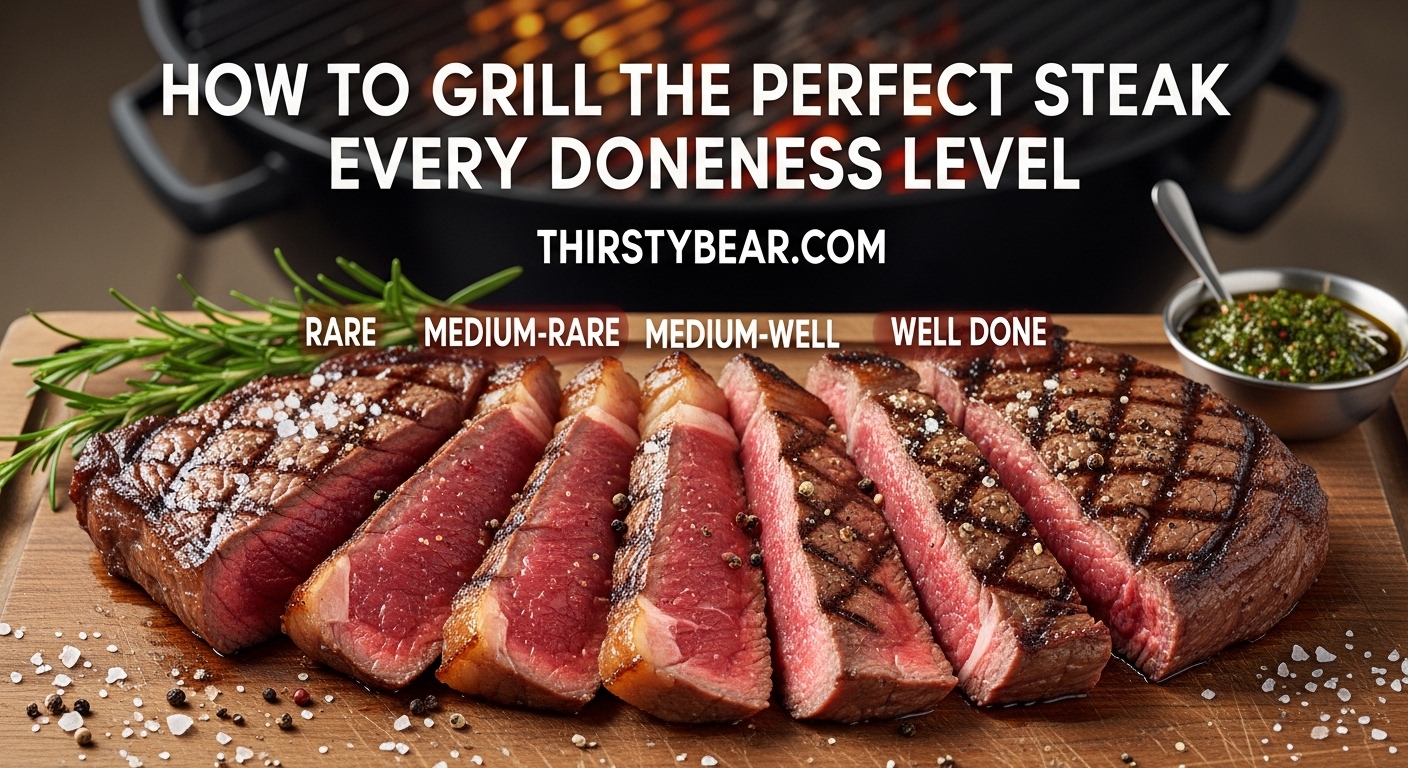
- Rare: 120F internal temperature. The steak feels very soft with significant resistance when you press it. The center is bright red, and the exterior has a dark brown sear. Many people avoid this level due to food safety concerns with beef that is not fully cooked, but it remains a valid preference for those who enjoy very rare steak.
- Medium-Rare: 130F target (pull at 120-125F). This is what most steak experts consider the ideal doneness. The interior shows a pink-red center that transitions to tan near the edges. The texture has some bounce back when pressed. At this temperature, the proteins have denatured enough to feel tender while retaining significant moisture. The flavor is vibrant and the steak feels indulgent without any livery notes.
- Medium: 140F target (pull at 130-135F). The center is pink but no longer red, with the majority of the steak turning tan. The texture has noticeable resistance and some firmness. This level works well for those who enjoy a warmer center but still want to experience the juiciness of a properly cooked steak. Some prefer this for leaner cuts that might taste too rare otherwise.
- Medium-Well: 150F target (pull at 140-145F). The interior shows only a slight hint of pink, mostly tan throughout. The texture feels firm with minimal give. At this temperature, significant moisture has been lost, and the steak begins to feel less tender. Many experienced grillers consider this overcooked, but it remains a popular choice for those who prefer their steak cooked through.
- Well-Done: 160F target (pull at 150-155F). The steak is cooked completely through with no pink visible. The texture is firm and the surface may appear heavily charred. At this temperature, most of the moisture has evaporated, and the steak can become tough if not sliced against the grain. We generally recommend thicker cuts for well-done, as thin steaks tend to dry out completely.
Grilling Times by Thickness
Temperature provides the most reliable indicator of doneness, but grilling times give you a helpful starting point for planning your cook. These times assume a preheated grill with temperatures above 500F.
The 3-3-2-2 rule comes from competitive grilling and provides a simple framework for thicker steaks. For a 1-inch steak, grill 3 minutes per side over high direct heat for the sear, then move to indirect heat for 3 minutes per side to finish. For a 1.5-inch steak, increase to 4 minutes per side for both the sear and finish phases. This method works best when combined with temperature checks using a reliable digital meat thermometer.
For a 1-inch steak, plan approximately 8 to 10 minutes total for medium-rare, 10 to 12 minutes for medium, and 12 to 14 minutes for medium-well. These times vary based on your grill temperature, starting steak temperature, and exact thickness. Always use the thermometer as your final guide.
For a 1.5-inch steak, expect 12 to 14 minutes for medium-rare, 14 to 16 minutes for medium, and 16 to 18 minutes for medium-well. Thicker steaks are actually more forgiving for beginners because the larger mass heats more slowly, giving you more time to adjust and check temperature without overshooting.
For thicker cuts over 2 inches, the reverse sear method becomes your best option. Start the steak on the cooler side of your grill at lower temperature (around 275 to 300F) until the internal temperature reaches 15 degrees below your target. Then move it directly over the hottest part of the grill for a final sear on each side. This approach eliminates the problem of burning the exterior before the center reaches the desired temperature.
The Finger Test Method
While a digital meat thermometer remains the most reliable tool, knowing the finger test gives you a backup method when cooking at someone elses grill or if your battery dies mid-cook.
The technique relies on comparing the firmness of your steak to parts of your own hand. Make a loose fist and use your other hand to press the fleshy part of your palm below your thumb. This fleshy area represents the feel of a rare steak.
Touch your thumb tip to your middle finger and press that same palm area again. The firmness increases noticeably and represents medium-rare. Continue to your ring finger for medium, and your pinky finger for well-done. Each step should feel progressively firmer.
With practice, this method becomes surprisingly accurate. I recommend using it alongside a thermometer until you build confidence in your technique. Most forum discussions confirm that experienced grillers can get within 5 to 10 degrees of their target using the finger test alone.
Expert Tips for Perfect Results
After testing hundreds of steaks, these lessons stand out as the most valuable for consistent success.
Flip only once. Some old advice suggests flipping every 30 seconds for even cooking, but professional grillers now recommend flipping only once. A single flip allows the steak to develop a more cohesive sear on each side rather than building multiple thin layers of crust. Leave the steak alone during each cooking phase except for the single flip.
Do not press down on the steak. I see people pressing their spatula firmly against steaks while grilling, squeezing out precious juices. This is one of the most damaging mistakes you can make. Those juices are what keep your steak tender and flavorful. Let the heat do the work instead.
Watch for flare-ups. Excess fat dripping onto flames creates sudden bursts of heat that can char your steak beyond repair. If flare-ups occur, move the steak to the cooler zone temporarily until the flames subside. On a gas grill, you can close the lid to smother the flames, or move the steak as needed.
Use the rest time. Resting your steak for at least 5 to 10 minutes after grilling makes a measurable difference. During cooking, the proteins contract and push juices toward the center. Resting allows the proteins to relax and redistribute those juices throughout the steak rather than spilling out when you cut into it. I always tent my resting steaks loosely with foil to keep them warm without trapping steam that would make the crust soggy.
Butter baste for extra richness. During the final minutes of grilling, you can add compound butter on top of your steak. Add a tablespoon of butter with herbs (thyme, rosemary, or garlic) to the top of your steak and let it melt while the steak finishes cooking. This basting method adds richness that professionals use at steakhouses worldwide.
Resting and Slicing Your Steak
The final steps often determine whether your steak reaches its full potential or loses what you worked so hard to achieve on the grill.
Why resting matters scientifically. When muscle fibers heat during cooking, they contract and squeeze moisture toward the center. Resting gives those fibers time to relax and reabsorb moisture from the center back toward the edges. A steak cut immediately after grilling loses significantly more juice than one that rests properly. Research shows that a 10-minute rest can increase juice retention by as much as 25 percent compared to cutting immediately.
Slice against the grain. The grain refers to the direction of the muscle fibers, which appear as lines running along the steak surface. Slicing perpendicular to these lines shortens the fibers in each piece, making the meat feel more tender with every bite. This technique matters especially for thicker cuts and for any steak cooked beyond medium-rare, where the longer muscle fibers can feel chewy if sliced incorrectly.
Let your steak rest for at least 5 minutes before slicing, and preferably closer to 10 minutes for thicker cuts. Place it on a cutting board or warming plate and loosely tent with foil. When ready to serve, slice across the grain at an angle for the best presentation and texture.
Frequently Asked Questions
What temperature to take steak off grill for medium rare?
Pull your steak off the grill at 120-125F for medium-rare. During a 10-minute rest under foil, carryover cooking will bring it to approximately 130-135F, which is the target internal temperature for medium-rare steak.
What is the 3-3-2-2 rule for steaks?
The 3-3-2-2 rule provides timing for grilling steaks by thickness. For a 1-inch steak, grill 3 minutes per side over high heat for searing, then 3 minutes per side on the cooler side to finish. For a 1.5-inch steak, increase to 4 minutes per side for both the sear and finish phases.
How to cook a perfect medium rare steak on a gas grill?
Preheat your gas grill to above 500F with the lid closed for 10-15 minutes. Season your steak generously with salt and pepper and bring it to room temperature. Place the steak directly over the hottest burner and grill 4-5 minutes per side for a 1-inch steak. Use a digital thermometer to check for 120-125F internal temperature, then rest for 10 minutes before serving.
How do you properly cook a steak to achieve the desired level of doneness?
The key to proper steak doneness is using a digital meat thermometer to measure internal temperature. Remove the steak from the grill 5-10 degrees below your target temperature since carryover cooking will continue raising the temperature during rest. For medium-rare, target 130F (pull at 120-125F). For medium, target 140F (pull at 130-135F). Always rest the steak 5-10 minutes before slicing.
What temp to take steak off the grill?
The pull temperature depends on your desired doneness: rare (120F pull), medium-rare (120-125F pull), medium (130-135F pull), medium-well (140-145F pull), and well-done (150-155F pull). Always account for 5-10 degrees of carryover cooking during the resting period.
Conclusion
Grilling the perfect steak to any doneness level comes down to understanding temperature, respecting carryover cooking, and giving your meat the attention it deserves. Start with quality cuts like ribeye, T-bone, or strip steak. Prepare properly by bringing to room temperature and seasoning generously. Master the two-zone cooking method on your grill and always use a digital meat thermometer to check the internal temperature before pulling. Remember to rest your steak for at least 10 minutes before slicing, and always slice against the grain.
With practice, you will develop an intuitive feel for timing and temperature that no guide can fully teach. Start with medium-rare as your target, since it represents the ideal balance of flavor, tenderness, and moisture that most steak enthusiasts prefer. Once you nail that, adjusting to other doneness levels becomes straightforward. Fire up your grill and enjoy the results.