Smoking a brisket might seem intimidating at first. That gorgeous hunk of beef sitting in your butcher’s case looks expensive, and the stories about dry, tough briskets are enough to make any beginner nervous. But here’s the truth: making incredible smoked brisket at home is absolutely achievable when you understand a few key principles. This smoked brisket recipe for beginners will walk you through every step, from picking the right cut to that final slice.
I’ve seen countless backyard cooks panic about ruining an expensive piece of meat. The reality is that brisket rewards patience more than almost any other cut. Low temperatures, steady smoke, and proper rest do the heavy lifting. Your job is simply to avoid a handful of common mistakes, and this guide will show you exactly how to do that.
What makes brisket special is its transformation through low-and-slow cooking. This tough cut of meat from the cow’s chest becomes melt-in-your-mouth tender when given enough time at low temperatures. The collagen breaks down into gelatin, the fat renders and bastes the meat from within, and the exterior develops that sought-after bark that makes smoked brisket one of the most rewarding things you can make in your backyard.
Table of Contents
What You’ll Learn in This Smoked Brisket Recipe
By the time you finish reading, you’ll know how to select the right brisket, trim it properly, apply the perfect seasoning, and smoke it until it’s tender and juicy. We’ll cover the infamous “stall” that confuses many beginners, discuss when to wrap your meat, and explain exactly how long to let it rest before slicing.
This recipe targets 225°F (107°C) for a traditional low-and-slow cook, though I’ll also mention some variations that work well for different schedules. The entire process from start to finish takes planning, but the hands-on time is surprisingly minimal compared to the rewards.
Selecting the Right Brisket
The foundation of great smoked brisket starts at the butcher counter. You want a whole packer brisket, which includes both the flat (the longer, leaner portion) and the point (the thicker, fattier section connected to it). Don’t ask them to separate these, because you need both parts working together during the cook.
The flat, also called the pectoral muscle, is the leaner portion that makes up most of the brisket’s length. The point sits above the flat and contains more marbling and fat, which makes it especially flavorful and tender after long smoking. When these two sections stay connected, they balance each other perfectly during the cook.
For USDA grade, Prime briskets offer the best marbling and typically produce the most tender result. Choice grade is more budget-friendly and still produces excellent smoked brisket if you manage your cook well. Avoid Select grade, as it has less marbling and can dry out more easily during those long hours in the smoker.
Size matters for beginners. A larger brisket (12-16 pounds) is actually easier to manage than a small one. Why? More fat means more moisture reserve during the cook. Smaller briskets under 8 pounds can dry out faster if you aren’t careful with your temperatures. Plan for about 1/2 to 3/4 pound of finished brisket per person to account for shrinkage and bone.
Look for a brisket with a thick fat cap on one side. This layer of fat will render during smoking and keep your meat moist. You want consistent marbling throughout the flat portion, visible as thin white streaks of fat woven into the red meat. The exterior should be clean without excessive bruising or dark discoloration.
When examining marbling, look for thin white lines running through the meat rather than large clumps of fat. Fine marbling indicates a quality cut that will render beautifully during smoking. The fat should look creamy white, not yellowed, which indicates freshness.
Essential Tools Overview
Before you start, gather your equipment. Having everything ready makes the process smooth and prevents last-minute scrambling when your smoker is running and your hands are covered in seasoning rub.
The most critical tool is a reliable thermometer. A digital probe thermometer that can monitor both your smoker temperature and the internal temperature of your brisket is essential. I recommend a model with multiple probe inputs so you can track both simultaneously without opening your smoker repeatedly.
For the actual cooking, you’ll need your smoker (offset, pellet, or electric all work fine), a sharp boning knife for trimming, a cutting board large enough to handle the full brisket, butcher paper for wrapping, and a cooling bin or cooler for resting. Paper towels for surface moisture and a spray bottle for spritzing are helpful additions.
A good boning knife gives you the precision needed for trimming, while a separate cutting board keeps things sanitary. Butcher paper should be food-grade and wide enough to wrap your brisket completely. Your cooler needs to be large enough to hold the full brisket and should be preheated before use.
One thing many beginners overlook: spare ribs or a test cook before your brisket cook. This lets you learn your smoker’s personality, understand how it holds temperature, and calibrate your timing estimates. A 12-hour brisket cook is not the moment to discover hot spots or temperature fluctuations in your equipment.
Trimming Guide
Trimming intimidates many beginners, but it’s simpler than you think. Your goal is to remove the hard silver skin (a tough membrane on the flat) and reduce the fat cap to a consistent 1/4 inch thickness across the entire surface.
Start by laying the brisket fat-side up on your cutting board. Locate the thick fat deposit in the center where the flat and point connect. Trim this down gradually, working toward the edges. The fat cap should end up about 1/4 inch thick everywhere. Don’t worry if it seems like you’re removing a lot; this is normal and necessary.
Next, flip the brisket and examine the meat side. You’ll see a silver-gray membrane called the silver skin running along one edge of the flat. This tissue doesn’t break down during cooking and makes the meat tough if left on. Slide your boning knife under the edge and peel it off in one piece or several strips.
As you trim, remove any loose pieces of meat or fat that won’t render properly. Also trim any hard fat deposits that didn’t soften during aging. What you’re aiming for is a uniform surface that will accept smoke evenly and allow the rendered fat to baste the meat throughout the cook.
Take your time with trimming. Rushing leads to inconsistent results. The goal is to create a uniform layer of fat and remove anything that could prevent smoke from penetrating the meat’s surface evenly. A well-trimmed brisket will cook more predictably and develop better bark.
Seasoning Basics
Here’s a secret from experienced pitmasters: keep it simple. The best smoked brisket often uses nothing more than salt and coarse black pepper. This combination, called Texas-style, lets the beef flavor shine through without distraction.
A classic ratio is 1 part kosher salt to 1 part coarse black pepper by volume. Some cooks add a small amount of garlic powder or other seasonings, but resist the urge to over-complicate your rub. Apply about 1/2 teaspoon of this mixture per pound of brisket, covering all surfaces including the sides.
Apply the seasoning generously, pressing it into the meat so it adheres. The rub will form a crust during smoking called the bark, which is one of the most flavorful parts of the finished brisket. Don’t be afraid to use more than you think necessary; the excess will fall off, but you want good coverage.
After seasoning, let the brisket sit at room temperature for 30-60 minutes before putting it in the smoker. This allows the salt to dissolve and penetrate the surface slightly, and brings the meat closer to smoking temperature gradually. This rest period also lets the rub hydrate slightly, creating better adhesion.
If you want to experiment with additional seasonings, add garlic powder, onion powder, or a touch of paprika for color. Some cooks include brown sugar for sweetness, but remember that sugar can burn at low smoking temperatures. Start with salt and pepper only, then branch out once you’ve mastered the basics.
Smoking Process
Set your smoker to 225°F (107°C) and let it preheat with your chosen wood loaded. For brisket, oak, hickory, and mesquite are the traditional choices. Oak provides a medium smoke flavor that doesn’t overpower the beef. Hickory gives a stronger, bacon-like essence. Mesquite offers the most intense smoke but can be overwhelming if used exclusively.
A common approach is to use oak or hickory as your primary wood, perhaps with a small amount of fruit wood like cherry or apple mixed in for sweetness. Avoid using only fruit woods for brisket, as they don’t provide enough of the flavor profile that characterizes classic smoked brisket.
Place your brisket fat-side up on the smoker grates, positioning the thick end toward the heat source if your smoker has temperature variations. Close the lid and resist the urge to check too frequently. Every time you open the smoker, you lose heat and smoke. Check only when you need to monitor temperature or add wood.
The general guideline is about 1 hour per pound at 225°F, but experienced cooks know this varies. Plan for approximately 1 hour 15 minutes per pound when including all phases of the cook. A 12-pound brisket might take 15-18 hours total. Some beginners also use 275°F as a compromise temperature that cuts cook time while still producing good results.
Throughout the cook, maintain consistent temperature in your smoker. Fluctuations lead to uneven cooking and can extend your timeline unpredictably. Keep your water pan filled if your smoker has one, as the moisture helps maintain consistent conditions and prevents the meat from drying out.
The Stall Explained
At some point during your cook, you’ll notice the internal temperature of your brisket stops rising, sometimes for an hour or even two. This is called the stall, and it’s the source of much beginner anxiety and ruined briskets.
The stall happens because of evaporative cooling. As moisture escapes from the surface of your brisket, it draws heat energy away from the meat, effectively cooling it the same way sweating cools your skin. Your smoker is heating the meat, but that heat is being used to evaporate surface moisture instead of raising the internal temperature.
Understanding this helps you respond correctly. The worst thing you can do is crank up your smoker temperature in frustration. This won’t speed the cook meaningfully and risks overcooking the outer layers while the inside catches up. The stall is normal and expected. It will end when enough moisture has evaporated that the meat begins heating again.
Many experienced cooks recommend spritzing the brisket with water, apple juice, or a mixture during the stall to help it through. This adds surface moisture that cools the meat slightly but also keeps it from drying out while waiting for the stall to break naturally.
The stall typically occurs between 150-170°F internal temperature. If you’re using the wrapping method, wrapping at this point essentially jumps you past the stall by trapping heat and steam. Either way, patience is your friend during this phase. The stall is your brisket telling you it’s working through its moisture and preparing for the final push to tenderness.
Wrapping Technique
Once your brisket reaches an internal temperature of 160-175°F, you have a decision to make. Many cooks wrap the brisket at this point, which helps it push through the stall faster and results in a different texture compared to unwrapped briskets.
Butcher paper is the preferred choice of many competition barbecuers and pitmasters. It breathes better than foil, allowing some smoke to continue penetrating the meat while still trapping enough heat to push the cook forward. The bark stays more intact with paper wrapping, preserving that delicious crust.
Foil wrapping (sometimes called the Texas crutch) conducts heat more efficiently and can speed your cook noticeably. However, it softens the bark and can make the exterior of your brisket soggy if left on too long. If you use foil, remove it during the final resting period to let some moisture escape and firm up the exterior.
To wrap properly, lay out a large sheet of paper or foil, place your brisket in the center, and fold the edges around the meat tightly but without crushing it. The wrap should be snug but not compressed. Return the wrapped brisket to the smoker or place it in a cooler to continue cooking.
Some cooks prefer never wrapping their brisket, accepting a longer cook time in exchange for a more pronounced smoke flavor and firmer bark. This approach requires patience but rewards you with an intensely smoky crust. Both methods produce excellent results; it comes down to personal preference and your time constraints.
Resting Time
Resting is non-negotiable. Pulling your brisket at 205°F and slicing immediately is one of the most common beginner mistakes. The meat needs time to redistribute the juices that have been pushed toward the center during cooking. Slicing too soon releases all those liquids, and they pool on your cutting board instead of staying in the meat.
Minimum rest time is 1 hour, but longer is better. Many competition cooks plan for 2-6 hours of rest in a cooler. A properly preheated cooler can hold a brisket at serving temperature for 4-6 hours while it rests, and this extended rest often produces the most tender, juicy results.
To prepare a cooler for resting, boil water and pour it into the empty cooler. Let it sit with the lid closed for 10-15 minutes to preheat. Empty the water, place your wrapped brisket inside, and close the lid. The hot water preheats the cooler so it doesn’t draw heat away from your meat during those crucial rest hours.
During the rest, your brisket temperature will continue climbing a few degrees as the outer sections come to equilibrium with the hotter center. The fibers that tightened during cooking also relax, which is part of what makes properly rested brisket so tender compared to meat sliced immediately after cooking.
Think of resting as the final step in the cooking process. Just as important as maintaining temperature in the smoker, proper rest ensures all your hard work results in the tender, juicy brisket you worked toward. Never skip this step, even if you’re tired and eager to eat.
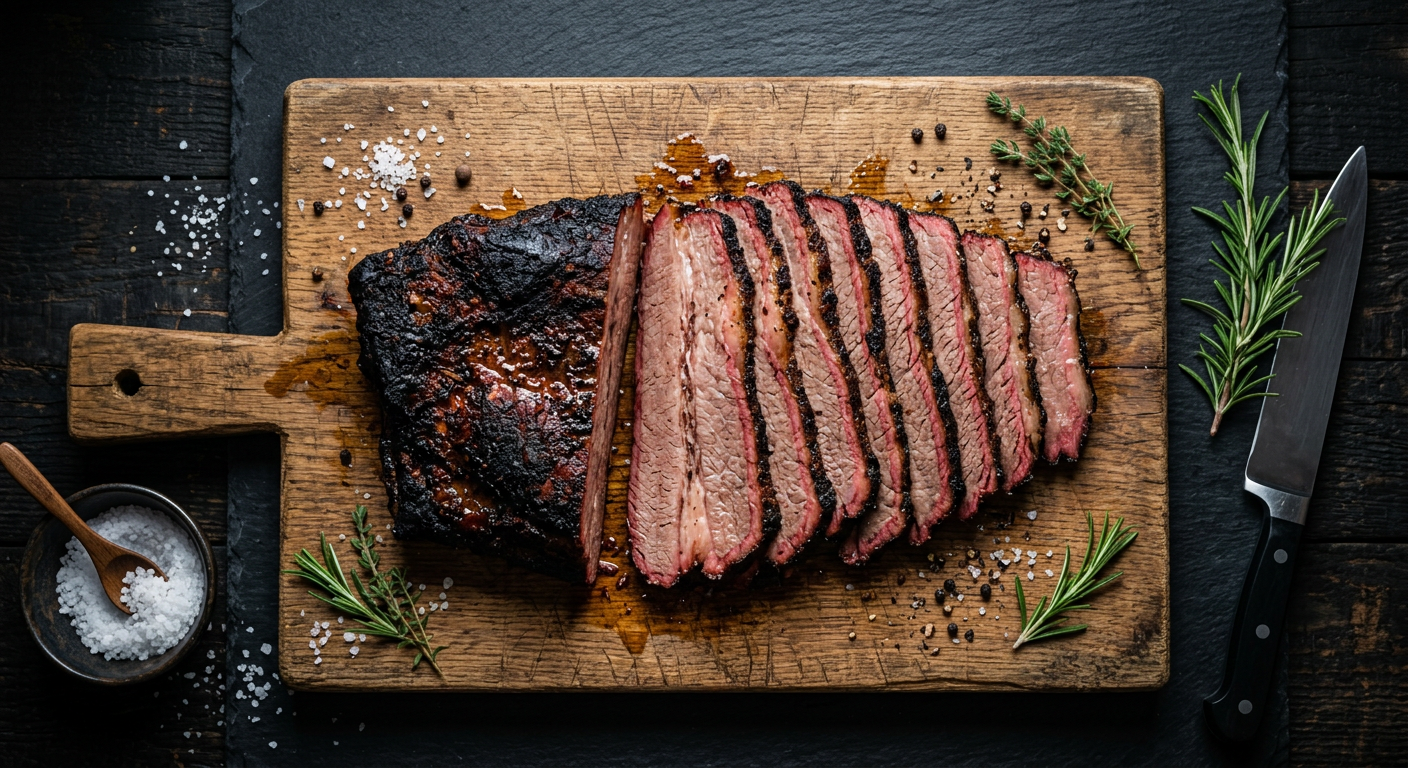
Slicing Against the Grain
Slicing technique separates good brisket from great brisket. The grain refers to the direction of muscle fibers in the meat. Cutting perpendicular to these fibers (against the grain) shortens the fibers in each slice, making them easy to chew and releasing the built-up juices.
Finding the grain requires looking carefully at your rested brisket. In the flat section, the grain typically runs in one consistent direction across the entire flat. In the point section, the grain can change direction in different areas, so you need to adjust your angle as you move between sections.
For the flat, make your slices perpendicular to the grain, cutting across the width of the flat. Each slice should be about 1/4 to 1/2 inch thick. As you move into the point section, the grain direction often angles differently, so rotate your cutting angle to stay perpendicular. This might mean cutting at a diagonal across the point.
Many pitmasters separate the point from the flat after the initial slice reveals the different grain directions. The point, with its higher fat content and different fiber structure, can be cut into cubes for burnt ends, which are considered a delicacy by brisket enthusiasts. The flat gets sliced into strips for serving.
Use a sharp slicing knife, ideally one with a long blade (10-12 inches) that can make clean strokes through the entire width of the brisket. A dull knife will crush the meat fibers and release less juice. Let the knife do the work with long, smooth strokes rather than sawing back and forth.
Temperature and Timeline Guide
Having a clear timeline helps you plan your smoked brisket cook and reduces stress on the day of the cook. Here’s a comprehensive guide for a traditional 225°F smoker temperature with a 12-pound brisket as our example.
Start by preheating your smoker to 225°F and preparing your wood. While it heats, trim and season your brisket. After seasoning, let it sit at room temperature for 30-60 minutes. Into the smoker it goes, fat-side up. From this point, expect approximately 1 hour 15 minutes per pound total time including rest.
A 12-pound brisket might reach 160°F (the wrap point) around hour 8-10. Wrap it and return to the smoker. The brisket will continue climbing, reaching 203-205°F around hours 12-15. This is your pull temperature. Remove from smoker, wrap if not already wrapped, and place in a preheated cooler.
Rest for a minimum of 1 hour, ideally 2-4 hours. Total time from smoker prep to slicing is approximately 14-18 hours for a 12-pound brisket. Plan your timeline to have the brisket ready when you want to serve, keeping in mind that a resting brisket can wait much longer than an undercooked one.
Temperature checkpoints to remember: smoker stays at 225°F, wrap at 160-175°F, pull at 203-205°F, and rest for at least 1 hour. These four numbers guide your entire cook. Everything else is just waiting and monitoring.
What is the 3-2-1 Rule for Smoking Brisket?
The 3-2-1 rule comes from smoking ribs and adapted for brisket by some cooks. The original rib method involves 3 hours unwrapped, 2 hours wrapped, and 1 hour resting. Some beginners apply this to brisket, but it’s not ideal.
Brisket behaves differently than ribs. The extended time needed for brisket to reach tenderness (often 1 hour per pound or more) means the 3-2-1 approach often leaves the interior undercooked while the exterior is overdone. Brisket needs to reach 203-205°F internally and should be pulled when probe-tender, not based on a time formula.
The better approach for beginners is to monitor temperature and use the stall as a guide. Wrap when internal temperature hits 160-175°F. Pull when temperature reaches 203-205°F AND a thermometer probe slides in with no resistance. Rest for at least 1 hour. This method adapts to your specific brisket rather than forcing it into a rigid time structure.
Some experienced cooks modify the 3-2-1 concept for brisket by extending the times significantly (perhaps 6-4-2 hours instead), but even then, temperature and tenderness remain the true indicators of doneness. Trust your thermometer and your probe test, not the clock.
Common Mistakes to Avoid
Beginners consistently make several mistakes that ruin otherwise good briskets. Knowing these pitfalls helps you avoid them in your own cooks.
Opening the smoker too frequently is the most common issue. Every peek lets out smoke and heat, extending your cook and creating temperature instability. Check your brisket only when necessary to add wood, check temperature, or wrap. Set a timer to remind yourself that opening “just for a second” adds up quickly.
Another major mistake is cutting the brisket before it rests. We’ve covered this already, but it bears repeating. Slicing immediately after pulling from the smoker releases all those carefully built-up juices. Your brisket needs that rest period to redistribute moisture and reach optimal tenderness.
Using the wrong wood or too much smoke can make your brisket taste bitter instead of delicious. For brisket, stick with oak, hickory, or mesquite as primary woods. Use moderate amounts rather than overloading your smoker. Thin blue smoke is ideal; thick white smoke creates creosote buildup that tastes harsh.
Finally, don’t judge doneness by time alone. A brisket that feels tender and probe-tender at 12 hours might need 14 hours. Time estimates are guidelines, not guarantees. Use your thermometer as your primary indicator and cook until the meat is truly done, not until a clock tells you it should be.
Not trimming enough fat is another common error. While you want some fat remaining, leaving a thick layer (over 1/4 inch) means parts of your brisket will be greasy rather than tender. Similarly, trimming the fat completely off leaves nothing to baste the meat during cooking. Balance is key.
Storage and Reheating
Properly stored leftover brisket stays good for 3-4 days in the refrigerator. Let it cool completely after slicing, then transfer to an airtight container or freezer bag. Press out excess air before sealing. For longer storage, freeze sliced brisket for up to 3 months, though the quality may decrease over time.
Reheating requires gentleness to avoid drying out your brisket. The oven works well at low temperatures (250°F or lower), covered in a baking dish with a splash of beef broth or au jus. Microwave heating works faster but can make the edges tough. Many prefer eating cold brisket slices on sandwiches, which avoids any reheating issues entirely.
The best way to use leftover brisket is in sandwiches. Chop or slice the meat, add some of the rendered fat back to keep it moist, and serve on a good bun with your favorite BBQ sauce or simply with pickles and onions. Brisket tacos, quesadillas, and breakfast hash are also excellent uses for leftovers.
When freezing brisket, consider storing it with some of its natural juices or a small amount of beef broth to help retain moisture during thawing. Thaw frozen brisket overnight in the refrigerator before reheating, and allow it to come to room temperature for about 30 minutes before serving cold sandwiches.
FAQs
How to smoke a brisket beginner?
To smoke a brisket as a beginner, select a whole packer brisket (12-16 lbs), trim the fat cap to 1/4 inch and remove silver skin. Season with a simple salt and pepper rub (1:1 ratio). Smoke at 225°F for approximately 1 hour per pound until internal temperature reaches 203-205°F. Wrap in butcher paper when temperature hits 160-175°F. Rest for at least 1 hour before slicing against the grain.
Is brisket good for high cholesterol?
Brisket is a red meat and contains cholesterol and saturated fat, so those with specific dietary concerns should consume it in moderation. A 3-ounce serving of brisket provides protein but also about 60-70mg of cholesterol. If you have high cholesterol or heart health concerns, consult your healthcare provider about appropriate portion sizes and frequency.
What is the 3-2-1 rule for smoking brisket?
The 3-2-1 rule (3 hours unwrapped, 2 hours wrapped, 1 hour resting) works well for ribs but is not ideal for brisket. Brisket needs to reach 203-205°F internally and should be pulled when probe-tender, not based on time alone. For beginners, it’s better to wrap at 160-175°F and pull at 203-205°F with a minimum 1-hour rest.
What are common mistakes when smoking brisket?
Common mistakes include opening the smoker too frequently, not letting the brisket rest before slicing, using too much smoke or the wrong wood type, and judging doneness by time instead of temperature and tenderness. Other errors include trimming the fat cap too thin, not seasoning generously enough, and pulling the meat before it’s truly probe-tender.
Final Thoughts on Your Smoked Brisket Journey
Smoking your first brisket is a commitment, there’s no denying that. The hours involved, the investment in quality meat, and the uncertainty of whether you’ve done everything right can create anxiety. But here’s what I want you to remember: the process itself becomes part of the reward. Standing next to your smoker on a cool morning, watching smoke curl from the vents, knowing that something incredible is happening inside that chamber, that’s part of what makes BBQ culture so special.
This smoked brisket recipe for beginners gives you a roadmap, but don’t be afraid to experiment as you gain confidence. Try different wood combinations. Play with seasoning ratios. Once you understand why each step matters, you can adapt the process to your preferences and equipment.
Your first brisket might not be perfect. That’s okay. Even experienced pitmasters have cooks that don’t turn out as expected. What matters is that you learn something each time, and that you keep refining your approach. Before long, you’ll be the one giving advice to nervous beginners at your local BBQ gathering.
The best brisket I ever made wasn’t my first or my most elaborate. It was the one where I finally stopped overthinking and trusted the process. Low heat, patient smoke, proper rest. These three things transform an intimidating cut of meat into something truly memorable. You have everything you need in this guide. Now it’s time to make your first smoked brisket.