Homebrewing has experienced a remarkable surge in popularity over the past decade, and for good reason. Making your own beer is not only deeply satisfying but also surprisingly approachable for newcomers. Whether you have been curious about crafting your own pints or are simply looking for a rewarding new hobby, beer brewing kits for beginners make it easier than ever to take that first step into the world of homebrewing.
In this comprehensive guide, we will walk you through everything you need to know about getting started with homebrewing. You will learn what essential equipment every beginner kit should include, understand exactly how the brewing process works from start to finish, and discover how to choose the right kit based on your space, budget, and brewing goals. By the time you finish reading, you will feel confident about taking that exciting first step into homebrewing.
Table of Contents
What to Look for in a Beginner Beer Brewing Kit
Not all beer brewing kits for beginners are created equal. Some include everything you need to make your first batch, while others require additional purchases that can quickly add up. Understanding what to look for will save you frustration and ensure you have a positive first experience.
Essential Equipment in Every Quality Kit
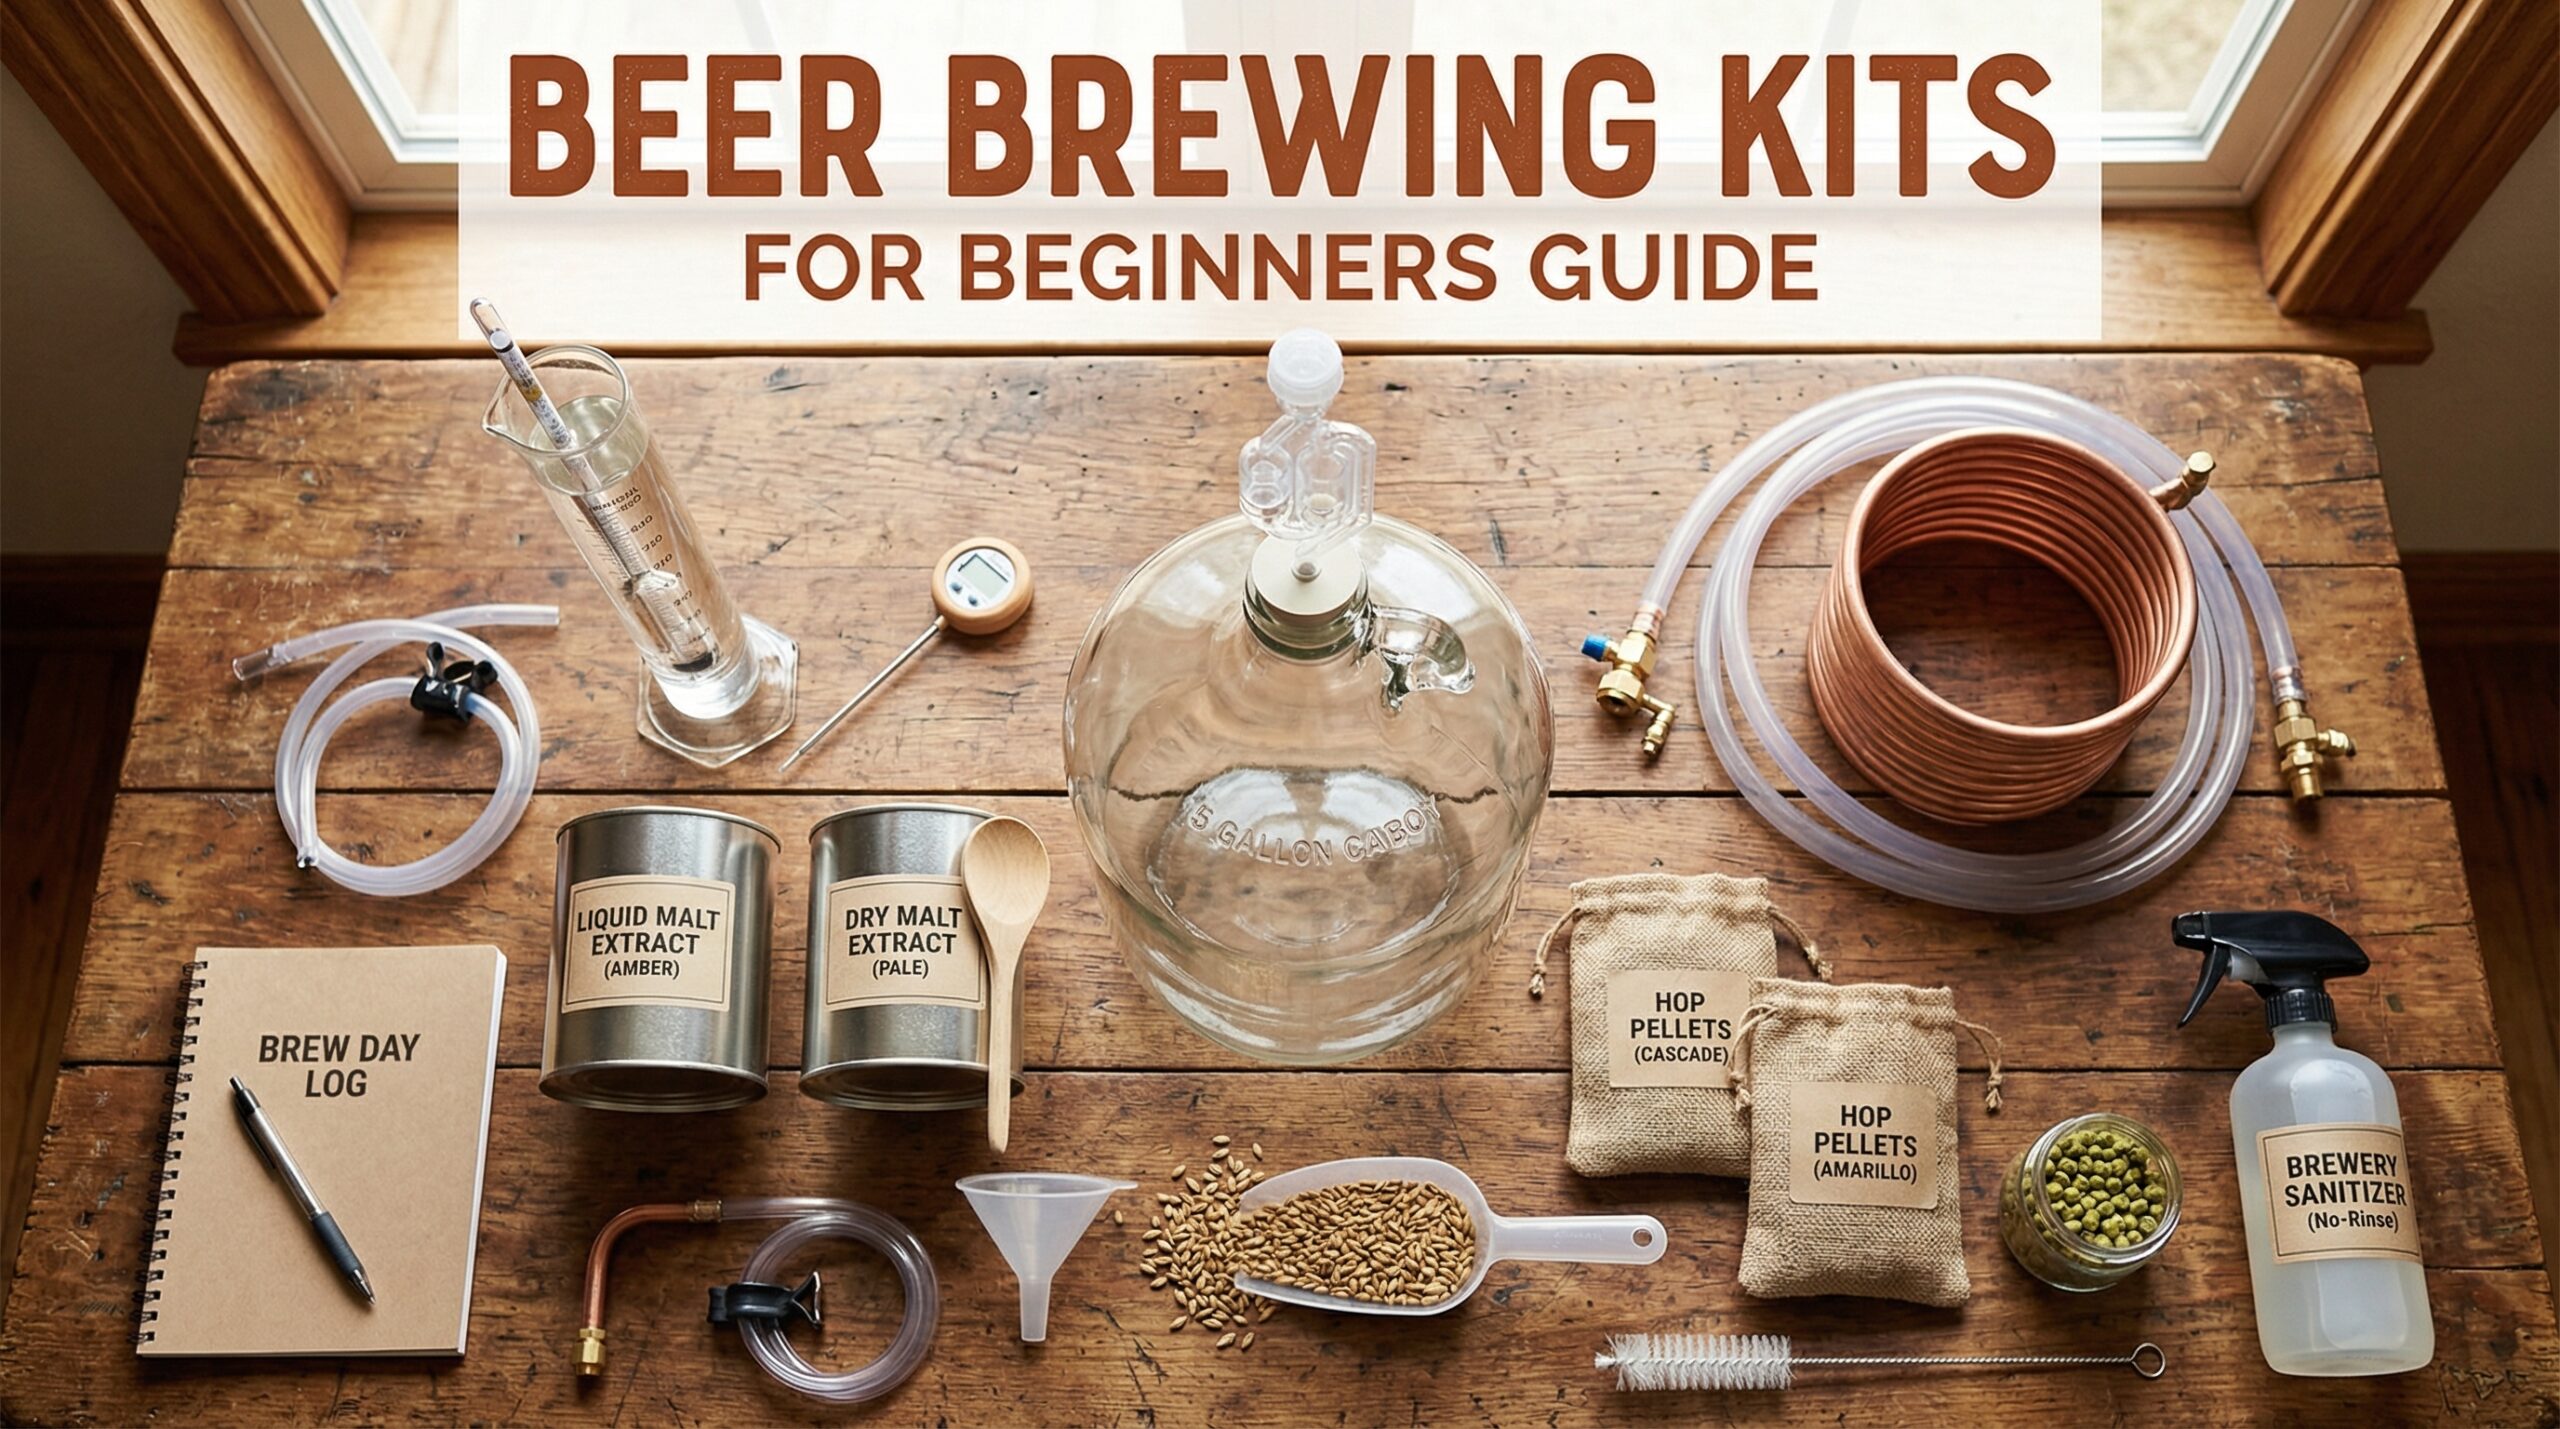
A complete beginner kit should include several core pieces of equipment. First, you need a fermenter, which is the vessel where your beer will actually become beer through the magic of fermentation. Most starter kits include either a plastic bucket fermenter or a glass carboy. Plastic buckets are lighter and more forgiving if you bump them, while glass carboys are easier to clean and do not scratch, though they can break if dropped.
Second, your kit needs an airlock, which allows carbon dioxide to escape from the fermenter while preventing outside air and contaminants from getting in. This simple device is absolutely critical for successful fermentation. Third, you need a way to boil your wort. Many starter kits include a specific brewing kettle, though some beginners use a large stockpot they already own.
Fourth, a hydrometer is essential for measuring the specific gravity of your beer, which tells you how much sugar has been converted to alcohol. This small tool helps you track fermentation progress and calculate your beer’s ABV. Fifth, and this cannot be stressed enough, you need sanitizer. Homebrewing success lives and dies by sanitation, and every kit should include a quality no-rinse sanitizer like Star San.
Finally, bottling supplies complete the essentials: a bottling bucket for transferring your finished beer, bottles (or a bottle tree to hold them), bottle caps, and a bottle capper. Some kits include these items explicitly, while others require separate purchases, so always check the component list before buying.
Signs of a Quality Beginner Kit
Beyond the equipment list, quality matters in several ways. Look for kits that include food-grade plastic or glass components specifically designed for brewing, not repurposed kitchen items. Clear, detailed instructions written for actual beginners, not experienced brewers, make a enormous difference in your first batch experience.
Kits that include recipe ingredients alongside the equipment simplify your first purchase. Some kits also provide access to customer support or online communities where you can get help when questions arise. Our team has tested dozens of kits, and we consistently find that kits from established retailers like Northern Brewer and MoreBeer tend to include better instructions and more reliable customer support.
How Homebrewing Works: From Ingredients to Your First Pint
Understanding the brewing process helps you appreciate what your kit enables you to do. Homebrewing is essentially a controlled food science experiment where yeast transforms sweet wort into alcoholic beer. Here is how it works step by step.
The Brewing Process Explained
Step 1: Sanitize Everything
Before you touch anything that will contact your beer after boiling, you must sanitize it. This means soaking your fermenter, airlock, bottling bucket, and bottles in a sanitizer solution. Any bacteria or wild yeast surviving this step can ruin your batch by creating off-flavors or causing infections. This step is not optional, and it is why sanitation receives so much emphasis in every brewing guide.
Step 2: Make or Prepare Your Wort
The wort is the sweet liquid that will become your beer. If you are using a malt extract kit, this typically involves dissolving extract syrup or powder in hot water. If you are doing all-grain brewing, you would be mashing grains to convert starches into sugars. For beginners, extract kits offer a much gentler learning curve because they simplify this step dramatically.
Step 3: Boil and Add Hops
Once your wort is ready, you bring it to a rolling boil and add hops at specific intervals. Hops contribute bitterness to balance the sweetness of the malt, along with flavor and aroma compounds that vary depending on when you add them during the boil. This step typically lasts 60 minutes and requires your full attention.
Step 4: Cool Rapidly
After boiling, you must cool your wort quickly, ideally to around 70 degrees Fahrenheit within 20 minutes. Rapid cooling helps prevent contamination and sets the stage for healthy fermentation. Many beginners use an ice bath, while others invest in an immersion chiller, a copper coil that you connect to a garden hose for continuous cooling.
Step 5: Pitch the Yeast
Once cooled, you transfer your wort to the fermenter and add your yeast packet. This step is called pitching. You simply sprinkle the dry yeast or pour liquid yeast onto the surface of the wort. The yeast will then begin consuming the sugars and producing alcohol and carbon dioxide.
Step 6: Ferment for One to Two Weeks
Fermentation is where the actual beer-making happens. You seal your fermenter with an airlock and let it sit at a consistent temperature, typically between 65 and 75 degrees Fahrenheit depending on the yeast strain. During this time, the yeast consumes sugars and produces alcohol and carbonation. Most ale yeasts complete primary fermentation within a week, though some benefit from an additional week for conditioning.
Step 7: Bottle with Priming Sugar
After fermentation is complete, you transfer your beer to a bottling bucket, adding a measured amount of priming sugar. This sugar will feed the remaining yeast in the bottle, creating the natural carbonation that makes beer feel alive and effervescent. You then fill each bottle, cap them, and store them at room temperature.
Step 8: Wait and Enjoy
After bottling, you wait another one to two weeks for carbonation to develop. Then, the moment of truth arrives: your first homebrew. Pour it into a glass, appreciate the bubbles rising, and taste what you created. It might not be perfect, and that is perfectly okay. Every brewer’s first batches teach valuable lessons.
Kit Types Explained: Choosing the Right Size and Style
When shopping for beer brewing kits for beginners, you will encounter several important choices. Understanding the differences between kit types helps you make an informed decision based on your specific situation.
1-Gallon vs 5-Gallon Kits: Which Should You Choose?
The most immediate choice involves batch size. Traditional homebrewing uses 5-gallon batches, which yield approximately 50 twelve-ounce bottles per batch. This is the standard for a reason, as it provides enough beer to share with friends and family while still being manageable for a first-timer.
However, 1-gallon kits have gained significant popularity in recent years, particularly for apartment brewers or those with limited storage space. These small-batch kits require less equipment, take up less counter space, and cost less upfront. The tradeoff is that you receive only about 10 bottles per batch, and the cost per bottle tends to be slightly higher since you are not benefiting from economies of scale.
From our experience, 1-gallon kits serve as excellent learning tools. The smaller volume means mistakes are less costly and cleanup is simpler. Once you complete a few successful small batches and feel confident in your technique, transitioning to 5-gallon batches becomes a natural next step. Many experienced brewers actually recommend starting small precisely because the reduced commitment makes the hobby less intimidating.
Extract Brewing vs All-Grain Brewing
Beyond size, you will encounter the choice between extract and all-grain brewing methods. Understanding this distinction is crucial for selecting the right kit.
Extract brewing uses pre-made malt extract, essentially concentrated wort that has already been brewed and condensed into syrup or powder. To use it, you simply dissolve the extract in water, add hops, and proceed to fermentation. This method dramatically simplifies the brewing process because the mashing step, where grains are soaked to extract sugars, has already been completed by the extract manufacturer.
All-grain brewing requires you to perform the full mashing process yourself, soaking grains at specific temperatures to convert starches into fermentable sugars. This method provides greater control over flavor profiles and typically produces fresher-tasting beer, but it demands more equipment, more time, and more technical knowledge.
For absolute beginners, extract brewing offers the gentlest introduction to the hobby. You can produce excellent beer using extract methods, and the shorter brew day, simpler process, and reduced equipment requirements make it ideal for your first several batches. Once you have mastered extract brewing and want to explore deeper into the craft, transitioning to all-grain becomes a natural progression.
Most beer brewing kits for beginners are extract-based kits, which aligns perfectly with this learning path. You might encounter terms like “partial mash” or “BIAB” (brew in a bag), which represent middle-ground approaches that offer some all-grain benefits while maintaining extract simplicity.
Common Beginner Mistakes and How to Avoid Them
Learning from others’ mistakes saves you frustration and potentially your first batch. After reviewing countless forum discussions and real brewer experiences, certain pitfalls appear again and again.
Sanitation Failures
The most common cause of ruined batches is poor sanitation. Any bacteria, wild yeast, or other contaminants entering your fermenter after the boil can create off-flavors ranging from sour to band-aid-like, or even cause your fermentation to go awry entirely. The solution is straightforward: sanitize everything that touches your beer after the boil. Use a quality no-rinse sanitizer, follow the instructions for proper concentration, and never skip this step regardless of how clean your equipment looks.
Inadequate Wort Cooling
Some beginners try to skip the cooling step or allow their wort to cool slowly overnight. This practice is risky because warm wort creates an ideal environment for bacterial growth. Always cool your wort quickly, ideally within 20 to 30 minutes. An immersion chiller is an excellent investment that pays for itself by improving your first batch and every batch afterward.
Bottling Too Early
Impatience leads many beginners to bottle their beer before fermentation fully completes. The result is excess carbonation in sealed bottles, creating what brewers call “bottle bombs.” These over-carbonated bottles can explode, creating mess and potential injury. Use your hydrometer to confirm fermentation is finished by taking readings on consecutive days and confirming they are stable. When in doubt, wait an extra few days before bottling.
Ignoring Fermentation Temperature
Yeast are living organisms that perform best within specific temperature ranges. Fermenting too hot produces fruity or solvent-like flavors, while fermenting too cold can stall fermentation entirely. Most ale yeasts prefer temperatures between 65 and 72 degrees Fahrenheit. If your brewing space runs warm, consider using a fermentation chamber or choosing a temperature-tolerant yeast strain.
Skipping Hydrometer Readings
Some beginners never use their hydrometer, treating it as an optional accessory rather than an essential tool. The hydrometer tells you whether fermentation has completed, helps calculate your beer’s alcohol content, and provides feedback about fermentation health. Take readings before pitching yeast and after fermentation appears complete. Comparing these numbers reveals whether your fermentation went as expected.
Understanding Ingredients: What Goes Into Your Beer
While beer brewing kits for beginners typically include pre-measured ingredients, understanding what those ingredients do enhances your appreciation for the brewing process and helps you troubleshoot if problems arise.
The Four Essential Ingredients
Beer consists of just four essential ingredients: water, malt, hops, and yeast. Water makes up approximately 90% of your final product, so its mineral content affects flavor significantly. Most municipal water supplies work fine for brewing, though some areas may require adjustments for optimal results.
Malt provides the sugars that yeast convert to alcohol. In extract brewing, malt comes as liquid or powdered extract. In all-grain brewing, malted barley and other grains provide the starches that you convert to sugars during mashing. Different malt varieties contribute varying sweetness, color, and flavor characteristics.
Hops add bitterness to balance malt sweetness, along with flavor and aroma compounds. Hop varieties range from floral and citrusy to earthy and piney, giving brewers enormous creative range. Beer styles typically call for specific hop characteristics, which is why recipes specify particular varieties and addition timings.
Yeast performs the essential transformation of sugar to alcohol and carbon dioxide. Ale yeasts work at warmer temperatures and typically complete fermentation faster than lager yeasts, which prefer cooler conditions. Each yeast strain produces distinct flavor compounds, making yeast selection a crucial decision for achieving desired beer characteristics.
Common Beer Styles for Beginners
When selecting your first recipe kit, you will encounter several beer style options. American Pale Ale is an excellent starting point because it is forgiving of minor technique variations while producing noticeably better results than mass-produced beers. Wheat beers also welcome beginners because their character comes partly from the yeast, which tolerates less-than-perfect conditions gracefully.
IPAs present more of a challenge due to their pronounced hop bitterness, which means extraction issues become more apparent. That said, many beginners start with IPAs because the bold flavors mask subtle imperfections. Brown ales and porters offer yet another path, showcasing malt-forward profiles that appeal to those who prefer darker beers.
How Much Does a Beginner Brewing Kit Cost?
Budget considerations matter when selecting beer brewing kits for beginners. Prices vary significantly based on quality, included components, and brand.
Basic 1-gallon starter kits often start around $30 to $50 and include minimal equipment plus a single recipe kit. These budget options work for absolute beginners who want to try the hobby without significant investment. However, they typically require additional purchases for bottling supplies and subsequent batches.
Complete 1-gallon kits with all essential equipment range from $50 to $100. These represent the sweet spot for most beginners, offering everything needed for your first batch plus basic supplies for continued brewing.
Entry-level 5-gallon kits typically cost $80 to $150 depending on included components. These kits require separate bottle purchases but provide the standard batch size that most homebrewers eventually target. The slightly higher upfront cost pays off through better value per batch produced.
Premium kits with higher-quality equipment, more recipes, and better instructions can exceed $200. These options suit beginners who are confident they will pursue homebrewing long-term and want reliable equipment from the start.
Beyond your initial kit, expect ongoing costs of approximately $30 to $50 per batch for ingredients when using 5-gallon extract kits. This cost per bottle typically falls below what you would pay for comparable craft beer at a bar or store, though the hobby does require equipment maintenance and occasional upgrades over time.
Space Considerations for Apartment Brewers
One concern that frequently arises in homebrewing forums involves brewing in small spaces. Apartment brewers often worry about smell, storage, and whether their setup is viable in a limited area. These concerns are understandable but rarely represent actual obstacles.
Most 1-gallon kit equipment fits easily in a single kitchen cabinet when not in use. The fermenter, even with airlock attached, occupies minimal floor space. Brew days produce some steam and a pleasant malt aroma that dissipates within a few hours. Bottles store efficiently in standard kitchen cabinets or a small rack in a closet.
For 5-gallon setups, storage becomes slightly more involved but remains manageable in most apartments. Consider whether you have access to a balcony, fire escape, or shared outdoor space for brew days. Many urban brewers use their stovetop for extract brewing without any special ventilation requirements.
Temperature control presents a more genuine challenge for apartment brewers. Fermentation produces the best results in temperatures between 65 and 72 degrees Fahrenheit, which many apartments exceed during summer months. Solutions include brewing seasonal styles that tolerate warmer temperatures, using a temperature-controlled fermentation chamber, or simply brewing during cooler seasons.
FAQ: Common Questions About Beer Brewing Kits for Beginners
What do I need to start brewing beer at home?
You need a fermenter, airlock, kettle or pot, hydrometer, sanitizer, and bottling supplies. Most beginner kits include all these components along with your first recipe ingredients. The essential items cost between $50-150 depending on kit quality and batch size.
How much does a beginner brewing kit cost?
Basic starter kits range from $30-50 for minimal setups, while complete beginner kits with all essential equipment typically cost $80-150. Premium kits with higher-quality components can exceed $200. Ongoing ingredient costs run $30-50 per batch for 5-gallon extract recipes.
What is the difference between extract and all-grain brewing?
Extract brewing uses pre-made malt extract syrup or powder, dramatically simplifying the process by eliminating the mashing step. All-grain brewing requires you to soak grains and convert starches to sugars yourself, offering more control but demanding more time, equipment, and knowledge. Beginners should start with extract brewing.
How long does it take to brew beer at home?
Actual active brewing time on brew day is 3-5 hours, though most of that is waiting for boiling and cooling. Fermentation then requires 1-2 weeks of mostly hands-off time. After bottling, you wait another 1-2 weeks for carbonation. Total time from start to enjoyment is typically 3-5 weeks.
Can I make beer without a kit?
Technically yes, but kits dramatically simplify the process by bundling essential equipment and pre-measured ingredients. Without a kit, you would need to source each component separately, research recipes thoroughly, and ensure all equipment is food-safe and suitable for brewing. Kits provide a structured path that reduces failure risk for beginners.
What are the essential tools in a homebrewing kit?
Every homebrewing kit should include a fermenter (bucket or carboy), airlock, brewing kettle or pot, hydrometer, sanitizer, bottling bucket, bottles, caps, and capper. Quality kits also include detailed instructions, recipe ingredients, and sometimes additional tools like a thermometer or stirring spoon.
Do I need special bottles or can I reuse commercial bottles?
You can absolutely reuse commercial glass bottles for homebrewing. Avoid bottles with pry-off caps if you only have a crown capper, since those require different equipment. Standard 12-ounce bottles with crown caps work perfectly. Avoid plastic commercial bottles, as they are not designed for the pressure buildup during carbonation.
Next Steps After Your First Batch
Completing your first batch is just the beginning of an incredibly rewarding journey. Most new brewers find themselves hooked after tasting their own creation and immediately want to brew again, experimenting with different styles and techniques.
Consider joining a local homebrew club, which provides invaluable hands-on learning opportunities. Experienced members often demonstrate techniques, share equipment, and offer guidance that accelerates your learning curve dramatically. Reddit’s r/Homebrewing and HomebrewTalk.com forums also offer active communities where you can ask questions and learn from thousands of fellow brewers.
As you gain confidence, you might explore recipe kits featuring different beer styles. Pale ales, IPAs, wheat beers, and porters each offer unique flavor profiles and brewing challenges. Some brewers eventually progress to all-grain brewing or even building custom systems, while others remain happy extract brewers making excellent beer for years.
Getting Started: Your First Brew Day Checklist
Before your first brew day, review this quick checklist to ensure you are prepared. Clear your schedule for 3-5 hours of mostly hands-on time. Sanitize all equipment the night before so you are not scrambling on brew day. Read through your kit instructions completely before starting, so you understand each step before executing it.
Gather all ingredients and verify nothing is missing from your kit. Prepare your workspace, ensuring you have enough counter space and a reliable heat source. Most importantly, relax and enjoy the process. Your first batch will not be perfect, and that is completely normal. Every brewer has been exactly where you are now, and the fact that you are reading this guide shows you are already ahead of most beginners.
Conclusion
Beer brewing kits for beginners open the door to one of the most satisfying hobbies you will ever discover. The process of transforming simple ingredients into something you created with your own hands produces a satisfaction that commercial beer simply cannot match. Whether you brew for the flavor, the creativity, or simply the joy of making something yourself, homebrewing rewards every effort you invest.
Remember the essentials as you begin: sanitation is non-negotiable, patience pays dividends, and every batch teaches you something valuable. Start with an extract kit that matches your space and budget, follow your instructions carefully, and do not be afraid to ask questions when they arise. The homebrewing community is remarkably welcoming to newcomers, and help is always available whether through online forums, local clubs, or kit manufacturer support lines.
Your first batch might take five weeks from start to glass, and it might not be the best beer you have ever tasted. But it will be your beer, made by your hands in your kitchen, and that realization never gets old no matter how many batches you complete. Welcome to the community of homebrewers, where millions of enthusiasts share your passion for crafting something special one batch at a time.