If you have been homebrewing for a while, you know that bottling day can feel like a second job. You wash bottles, sanitize them, cap them one by one, and then wait weeks for carbonation. That process works, but it takes up hours of your time and leaves you with a pile of sticky bottles to clean. This Homebrewing Kegging Guide will show you a better way.
Kegging lets you skip the bottle marathon entirely. You transfer your finished beer into a pressurized Cornelius keg, hook it up to CO2, and pour pints straight from the tap whenever you want. No more capping, no more waiting, no more inconsistent carbonation from bottle-to-bottle variation. Our team has been using kegging setups for over eight years, and we have helped dozens of homebrewers make the switch. This guide walks you through everything you need to know to start kegging at home.
The transition from bottles to kegs is one of the biggest upgrades you can make to your brewing workflow. Draft beer at home means better flavor retention, precise carbonation control, and less environmental waste. You also get to skip the repetitive strain on your hands from crimping bottle caps. By the end of this guide, you will understand how to set up your CO2 system, choose between ball-lock and pin-lock kegs, carbonate your beer properly, and troubleshoot the most common issues that come up. We cover the gear, the techniques, and the real-world lessons that forums like Reddit’s r/Homebrewing and HomebrewTalk have taught us over the years.
2026 Essential Equipment for Kegging
Before you can pour draft homebrew, you need to gather the right components. The good news is that a basic kegging setup requires less equipment than bottling. The bad news is that the upfront cost is higher. Here is what you need to get started.
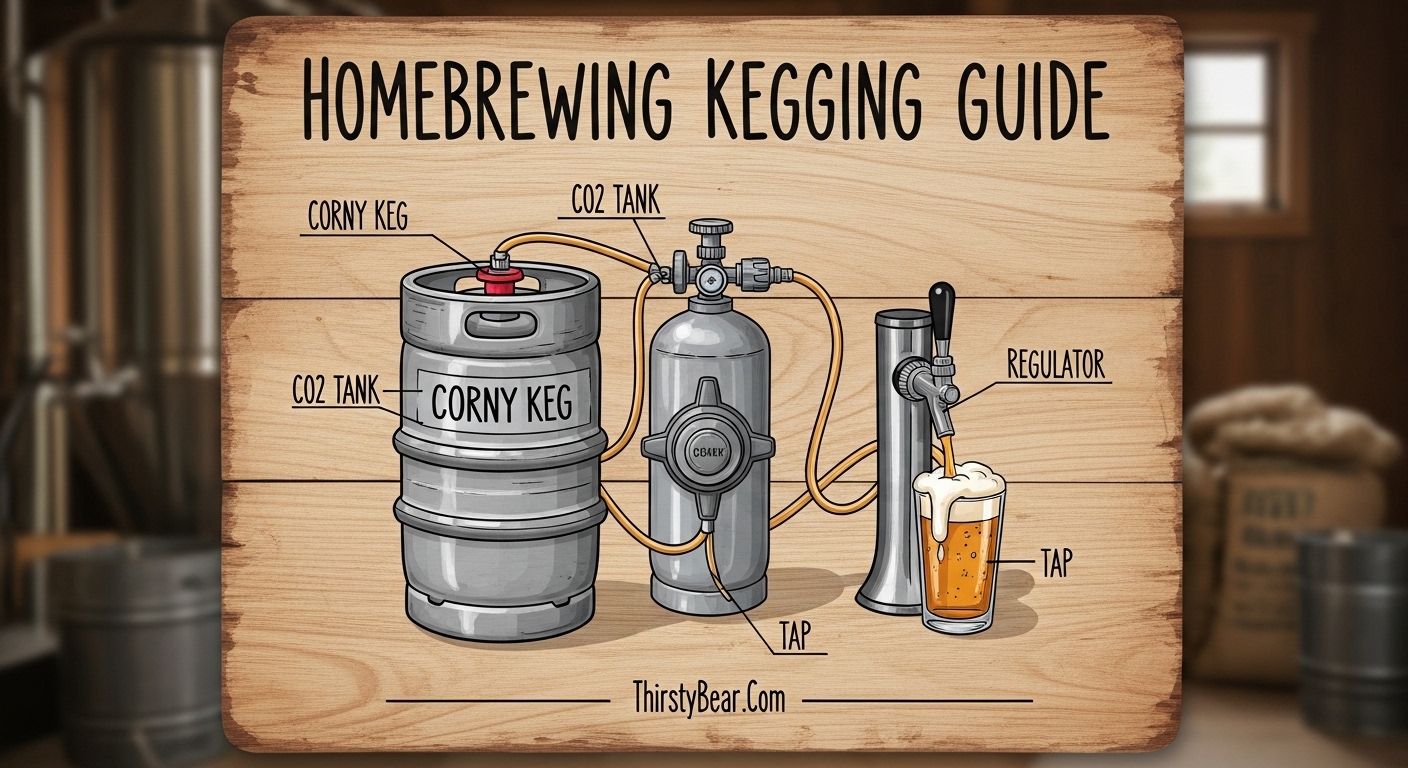
CO2 Tank
This is the heart of your kegging system. You will need a pressurized CO2 cylinder to push beer through the lines and keep it carbonated. Most homebrewers use a 5-pound tank, which is small enough to fit inside a keezer or refrigerator and provides plenty of refills for a typical homebrew schedule. Larger tanks like 10 or 15-pound options cost more upfront but reduce how often you need to get refills.
CO2 tanks require hydrostatic testing every five years, so check the date stamped on the collar before buying a used tank. This test ensures the tank can safely hold pressure. If the test is expired, a reputable supplier will refuse to fill it. The tank valve connection uses a standard CGA-320 fitting in North America, which is the same connection used for soda streams and beverage CO2 systems.
Regulator
The regulator attaches to your CO2 tank and controls the pressure that goes into your keg. A good regulator lets you set and hold a specific PSI (pounds per square inch). Most homebrew regulators have two gauges: one shows tank pressure, the other shows output pressure. Look for a regulator with a check valve, which prevents beer from backing up into the CO2 line if something goes wrong.
Single-gauge regulators are cheaper but give you less information about your system. Two-gauge regulators show you when the tank is running low (the tank gauge drops) and when you have a blockage or problem (the output gauge shows unexpected readings). Spending a bit more on a dual-gauge regulator saves headaches later.
Cornelius Keg (Corny Keg)
The Cornelius keg is the standard vessel for homebrewing. These are stainless steel containers that hold about 5 gallons (19 liters) of beer. They have a gas post on one side and a liquid post on the other, along with a pressure relief valve. You will see two main types: ball-lock and pin-lock. We cover the difference in the next section.
New Cornelius kegs cost $80-120 each. Used ones in good condition run $40-70. If you buy used, inspect carefully for dents, rust, and working O-rings. A bad keg can mean lost beer and endless frustration. Most homebrewers start with one keg and add more as they expand their setup.
Quick Disconnects
Quick disconnect fittings let you attach and detach gas and liquid lines without twisting or threading. They snap on and off with a simple collar release. You need one set for the gas side (usually gray or blue) and one for the liquid side (usually black or red). Make sure you get the right type for your keg.
Ball-lock and pin-lock kegs use different disconnect fittings. The posts have different thread patterns and spacing. If you buy ball-lock kegs, get ball-lock disconnects. The same rule applies for pin-lock. Mixing them up means the fittings will not seal properly and you will have leaks.
Beer Lines and Gas Lines
You need tubing to connect your regulator to the gas post and your liquid post to the tap. Vinyl beer line works fine for most setups and is inexpensive. The length matters more than you might think. Longer lines create more restriction, which helps control foaming. For a standard setup with 8-12 PSI serving pressure, you typically want 3-6 feet of 3/16 inch ID beer line.
Gas line is usually 1/4 inch ID and carries CO2 from the regulator to the keg. You want this as short as possible to minimize pressure drop. Beer line needs to be longer to provide the restriction that keeps your pour smooth and foamy-free. Stainless steel braided lines look professional but are not necessary for most home setups.
Kegerator or Conversion Kit
You need a way to keep your keg cold. A dedicated kegerator is purpose-built with a tap tower and temperature control. Alternatively, you can convert a chest freezer or refrigerator with a temperature controller like an Inkbird. This is what most homebrewers do because it costs less and gives you more flexibility on keg capacity.
A 7 cubic foot chest freezer typically fits 2-3 Cornelius kegs plus CO2 tank. A mini refrigerator fits 1-2 kegs. The conversion costs $50-100 for a temperature controller plus whatever you pay for the used appliance. Many homebrewers find a free or cheap freezer and spend $80 total on the conversion.
Understanding Keg Anatomy
A Cornelius keg is a pressurized vessel with several key parts. Knowing what each component does helps you troubleshoot problems and maintain your equipment properly. This section covers both the overall structure and the specific components you need to understand.
Ball-Lock vs Pin-Lock Kegs
The two main types of Cornelius kegs are ball-lock and pin-lock. The difference is in how the quick disconnects attach to the posts. Ball-lock kegs use a ball-bearing mechanism where you push the disconnect on and it locks into place with a click. These are the most common in North America, especially for homebrewing.
Pin-lock kegs use a different system where two small pins slide into notches on the disconnect. Both work well, but ball-lock is easier to find and has more accessory options. The internal components are largely the same, so maintenance is identical. Most new homebrewers should go with ball-lock because replacement parts and tutorials are widely available.
If you already have pin-lock kegs, stick with that system to avoid replacing everything. Some older breweries and homebrew shops still use pin-lock, so both systems remain relevant. The choice matters mostly for compatibility with your quick disconnects and gas fittings.
Key Components
The gas post is where CO2 enters the keg. It has a one-way valve that lets gas in but not out. The liquid post does the same job for beer going out. Both posts have O-rings that create a seal, and these need to be replaced periodically because they degrade over time. Spare O-ring kits are inexpensive and should be part of every kegger’s supplies.
The dip tubes are internal tubes that reach almost to the bottom of the keg. The gas dip tube is shorter and sits near the top, while the liquid dip tube is longer and reaches the bottom to get every drop of beer. If your keg is not draining properly, the dip tubes might be clogged or damaged. Inspect them during every cleaning cycle.
The pressure relief valve is a safety feature that lets you vent pressure if it gets too high. You should test this periodically by pulling the ring to make sure it works. It is also the valve you use to vent the keg before opening it after fermentation. Never try to force open a pressurized keg.
O-rings seal the posts and the lid. They are made of rubber and can dry out, crack, or wear out with use. Keeping spare O-rings on hand is essential. A small tube of food-safe keg lube helps them last longer and makes assembly easier. Apply a thin coat every time you reassemble to extend O-ring life significantly.
Cleaning and Sanitizing Your Keg
Clean and sanitize your keg every time you use it. This is non-negotiable because any contamination will ruin your beer. The process is straightforward but requires attention to detail. Skipping steps here is the most common cause of off-flavors in kegged beer.
Disassembly and Initial Rinse
Start by depressurizing the keg completely. Pull the pressure relief valve until you hear no more gas escaping. Then remove the lid and pull out the dip tubes. Take off the posts and their O-rings. Rinse everything with hot water to remove loose debris and old beer residue. Do not skip this rinse step because dried-on sediment is harder to clean later.
Deep Cleaning
Fill the keg with hot water and add a cleaning solution. PBW (Powdered Brewers Wash) is the standard choice for homebrewers. Oxyclean Free is a budget alternative that works well. Let it soak for at least an hour, then scrub the interior with a soft brush. Pay attention to the area around the weld marks where sediment can build up.
Clean the dip tubes, posts, and O-rings separately in a small container with cleaning solution. Use a pipe cleaner or bottle brush on the dip tubes to make sure they are clear. Rinse everything thoroughly with clean water until no residue remains. Any remaining cleaner will affect the taste of your next batch of beer.
Sanitization
After cleaning, you need to sanitize everything before adding beer. Star San is the most popular no-rinse sanitizer for homebrewers. Mix it according to the package directions and apply it with a spray bottle or by soaking components for 30 seconds. Everything that touches your beer after fermentation needs to be sanitized, including the interior of the keg, the lid, the posts, the dip tubes, and your transfer tubing.
One important note: Star San works best in solutions between 2.0 and 4.0 pH. If your water is too alkaline, the sanitizer loses effectiveness. Also, do not let sanitized equipment dry out before use. Wet contact is necessary for the sanitizer to work properly.
Used Keg Considerations
If you are buying a used keg, inspect it carefully before you use it. Look for dents on the body that could weaken the vessel. Check for rust, especially around the welds and the bottom. Examine the O-rings and replace them if they look worn. Some used kegs develop “beer stone,” a calcium carbonate buildup that looks like a white chalky film. A dedicated beer stone remover or a long soak in acid-based cleaner takes care of this.
Forum members on HomebrewTalk recommend buying from reputable sources rather than gambling on mystery kegs from garage sales. The cost difference is small, but the frustration of getting a bad keg is significant. When you find a good source for used kegs, buy a few extras because they will eventually need replacement.
CO2 Tank and Regulator Setup
The CO2 system is what makes kegging work. Without it, you have just a pressurized container with no way to dispense or carbonate your beer. Setting it up correctly is critical for both safety and proper carbonation. This section walks you through the entire CO2 setup process.
Tank Sizing
A 5-pound CO2 tank is the sweet spot for most homebrewers. It fits inside standard keezer conversions and mini refrigerators, provides 30-40 refills depending on your usage, and is light enough to carry easily. If you have multiple kegs on tap or serve at parties frequently, a 10-pound tank reduces refill trips.
You can exchange empty tanks at welding supply stores, beverage supply shops, and some homebrew shops. The exchange cost is typically lower than buying a new tank. Make sure the tank is current on its hydrostatic test, which is stamped on the collar. Tests are valid for 5 years for modern tanks. An expired tank cannot be legally refilled.
Regulator Basics
Screw the regulator onto the tank valve hand-tight, then snug it with a wrench. Do not over-tighten. Open the tank valve slowly and watch the high-pressure gauge. It should show the tank pressure, which varies with temperature but is typically around 800-1000 PSI when full.
Turn the adjustment knob to set your output pressure. For most ales, you will serve at 8-12 PSI. For stouts and nitrogen beers, you might use a nitrogen blend. The low-pressure gauge shows what you are actually sending to the keg. If the low-pressure gauge drops when you open the tap, your tank might be empty or there might be a leak upstream.
Leak Detection
Soap water or Starsan solution applied with a spray bottle reveals leaks. Spray all connections, the tank valve, the regulator fittings, and the keg posts. Bubbles indicate escaping gas. Tighten the fitting or replace the O-ring or seal as needed. Never ignore a leak because CO2 can displace oxygen and cause asphyxiation in enclosed spaces.
Our team has found that most leaks happen at the connection between the regulator and the tank valve. That seal uses a gasket that can degrade over time. Carry a spare gasket for emergencies. A leaking CO2 tank in an enclosed space like a keezer is a serious safety issue.
Carbonation Methods Explained
Carbonating beer in a keg is different from bottle conditioning. You are forcing CO2 into solution under pressure rather than relying on fermentation to produce carbonation. This gives you precise control over the final carbonation level. Two main methods dominate homebrewing: Set-N-Wait and Crank-N-Shake.
Understanding PSI and Volumes of CO2
Different beer styles need different carbonation levels. We measure this in volumes of CO2, which is the amount of CO2 dissolved in a volume of beer. A typical American lager sits around 2.5 volumes. A British bitter might be 1.5-2.0. A Belgian Witbier can be 3.0 or higher. Consult a carbonation chart to find your target.
Carbonation depends on temperature and pressure. Colder beer absorbs CO2 more easily. The rule of thumb is that at 38F (3C), 12 PSI gives you roughly 2.5 volumes of CO2. Warmer temperatures require higher pressure to achieve the same carbonation. This is why temperature control matters in kegging. A poorly insulated keezer that varies by 10 degrees will give you inconsistent results.
Set-N-Wait (Set and Forget)
This method is exactly what it sounds like. You set your regulator to serving pressure (typically 8-12 PSI depending on your beer style and line length), connect the gas, and wait. Most brewers report that beer is ready in 7-10 days using this method. Some carb stone setups speed this up by diffusing CO2 directly into the beer.
The advantage of Set-N-Wait is simplicity and consistency. You set it and forget about it until the beer is ready. The downside is the waiting time. This is the preferred method of experienced homebrewers because it produces very even carbonation with minimal risk of over-carbonation. The beer equilibrates naturally over time.
Crank-N-Shake (Force Carbonation)
This method accelerates the process by cranking up the pressure and agitating the beer. Set your regulator to 25-30 PSI, connect the gas, then rock or shake the keg for 5-10 minutes. Re pressurize if the pressure drops. Some brewers repeat this a few times over an hour. You can have carbonated beer in under two hours.
The risk is over-carbonation. It is easy to get excited and leave it at high PSI too long. The beer ends up gushing when you open it or foaming excessively when you pour. If this happens, vent the keg, let it settle, and try again at lower pressure. Start checking after 30 minutes of shaking.
PSI Reference Chart
Use this chart as a starting point for carbonation at 38F (3C). Adjust based on your actual temperature and your taste preferences. Remember that your specific setup might require slight adjustments from these baseline values.
For 2.0 volumes (session ales): Set regulator to 6 PSI.
For 2.5 volumes (standard lagers and ales): Set regulator to 12 PSI.
For 3.0 volumes (Belgian styles, wheat beers): Set regulator to 18 PSI.
For 3.5+ volumes (fruit beers, stouts): Set regulator to 25 PSI.
Remember that these are approximate values. Your actual results depend on temperature precision, line length, and the specific beer. Always err toward lower PSI and more time if you are unsure. Under-carbonated beer is easier to fix than over-carbonated beer.
Transferring Beer to Your Keg
Getting beer from your fermenter into the keg without introducing oxygen is one of the most important skills in kegging. Oxygen causes staling and off-flavors, and it is especially damaging after fermentation is complete. A careful transfer can mean the difference between beer that tastes fresh for months and beer that goes stale in weeks.
CO2 Purging
The best way to minimize oxygen exposure is to purge the keg with CO2 before transfer. Connect the gas line to the empty keg, set the regulator to 5-10 PSI, and let it push CO2 through the open liquid post for 10-15 seconds. You will see bubbles coming out. Close the valve, disconnect, and you have a layer of CO2 sitting on top of the empty keg. When you transfer beer in, the CO2 gets pushed out instead of oxygen getting in.
If you do not have a way to purge, at minimum use a spray bottle filled with Star San and spray the interior of the keg before adding beer. The sanitizer will not remove oxygen but will kill any contaminants. Purging is better and only takes a few extra seconds.
The Transfer Process
Start by placing the fermenter above the keg so gravity helps the flow. Use a racking cane or auto-siphon to draw beer from the fermenter. Run the tubing to the liquid post on the keg. Open the lid slightly to allow air to escape as the keg fills, but do not remove it entirely because you want the CO2 purge to stay in place.
Go slowly. Rushing increases splashing and agitation, which introduces oxygen. Our team has found that a slow, steady siphon produces better-tasting beer than a fast gravity drain. The process takes 10-15 minutes for a typical batch, and that time investment is worth it. If you hear gurgling sounds, your flow is too fast.
Dry Hopping and Additions in the Keg
If you want to add hops, spices, or other ingredients after fermentation, you can do this in the keg. Add the ingredients, seal the lid, and purge the headspace with CO2 before resealing. This is convenient but makes it harder to remove the ingredients later. Use a hop sock or bag to make retrieval easier. Some brewers use fine mesh bags that keep hop particles contained.
Troubleshooting Common Kegging Issues
Even with good technique, problems come up. Here is how to solve the most common issues homebrewers face with kegging. Most issues fall into three categories: foamy beer, flat beer, or leaks. Each has multiple potential causes and solutions.
Foamy Beer
Foam is the number one complaint from new keggers. Several factors can cause it. Temperature is the most common. If your beer is warmer than ideal, CO2 comes out of solution more easily and creates foam. Keep your keg at serving temperature (38-42F for ales, 44-48F for lagers) and check your fridge or keezer thermostat with a separate thermometer.
Line length is the next factor. If your beer line is too short, there is not enough restriction to control the flow, and beer arrives at the tap under too much pressure. Use at least 3 feet of 3/16 inch ID line for most setups. Longer lines with smaller diameter increase restriction and reduce foaming. Some brewers use up to 10 feet of line specifically for foam control.
Pressure spikes when you open the tap can also cause foam. Open the tap slowly rather than cranking it full blast. If you hear a hissing sound when you pour, check for a sudden pressure increase that might be coming from the regulator or a blockage. A faulty check valve can also cause pressure issues.
Flat Beer
Under-carbonated beer is usually a result of insufficient pressure, wrong temperature, or not enough time. Check that your regulator is actually delivering the pressure you set it to. Gauges can be inaccurate. Use a different gauge to verify if you suspect a problem.
If your beer is too warm, it cannot hold as much CO2. Lower the temperature and give it more time to equilibrate. Even with proper pressure and temperature, some beer styles take two weeks or longer to reach target carbonation using the Set-N-Wait method. Patience is part of the process.
Also check your CO2 tank. An empty or nearly empty tank might show pressure on the gauge but not deliver enough volume to actually carbonate the beer. Weigh the tank or keep track of how many fills you have gotten from it. A 5-pound tank provides roughly 30-40 pints before it runs low.
Leaks
Leaks waste CO2 and can leave you with flat beer before you are ready. Inspect all connections with soapy water to find the source. Common leak points include the tank valve seal, regulator fittings, post O-rings, and the lid seal. Tighten or replace as needed. Carry spare O-rings and a backup regulator gasket in your brewing kit.
If you hear a continuous hissing sound near the regulator, that is a clue that something is not sealing properly. Do not ignore it. CO2 leaks are not just wasteful, they can displace enough oxygen in an enclosed space to cause health issues. If you suspect a major leak, open windows and doors before troubleshooting.
Kegging vs Bottling: Which Is Right for You
Both bottling and kegging have their place in homebrewing. Here is an honest comparison to help you decide which approach fits your situation. The right choice depends on your brewing volume, budget, and how you like to enjoy your beer.
Kegging saves enormous time after the initial setup. Once your system is running, you can rack a batch, set the regulator, and forget about it for a week. No bottle washing, no sanitizing individual caps, no labeling. The cleanup is faster too. Pour the dregs, rinse the keg, and you are done in minutes instead of hours.
The upfront cost is higher for kegging. A basic setup with tank, regulator, and keg costs $300-400 or more. A full bottling setup is under $100. If you brew infrequently or only do small batches, bottling makes more financial sense. Calculate your break-even point based on how many batches per year you brew.
Bottling lets you share beer more easily. You can hand out bottles at a party, enter competitions, or give samples without hauling a CO2 tank and keg. Bottles are also portable in a way that a keg setup is not. A 12-pack of bottles fits in a backpack for a tailgate or camping trip.
For homebrewers who drink their beer at home and want draft pours, kegging is the clear winner. If you value portability or are on a tight budget, bottling still works fine. Many homebrewers do both: keg their main batches and bottle a few bottles for sharing or competitions.
Frequently Asked Questions
What equipment do I need to start kegging homebrew?
You need a CO2 tank, regulator, Cornelius keg (ball-lock or pin-lock), quick disconnects, beer and gas lines, and a way to keep the keg cold (kegerator or conversion fridge/freezer). Optional but helpful items include a pressure relief valve, spare O-rings, and a carbonation chart.
How do I clean and sanitize my Cornelius keg?
First depressurize and disassemble the keg. Rinse with hot water, then soak in a cleaning solution like PBW for at least an hour. Scrub the interior, clean the dip tubes and posts separately, and rinse thoroughly. Sanitize everything with a no-rinse sanitizer like Star San before reassembling and adding beer.
How long does it take to carbonate beer in a keg?
Using the Set-N-Wait method at 10-12 PSI and 38F, most beers are ready in 7-10 days. The Crank-N-Shake force carbonation method can produce carbonated beer in under 2 hours but requires more attention to avoid over-carbonation.
What is the difference between ball lock and pin lock kegs?
Ball-lock and pin-lock refer to how the quick disconnects attach to the keg posts. Ball-lock uses a ball-bearing mechanism and is the most common type in North America. Pin-lock uses two small pins that slide into notches. Both function identically; ball-lock is more widely available and has more accessory options.
How do I force carbonate my homebrew?
To force carbonate using the Crank-N-Shake method, set your regulator to 25-30 PSI, connect the gas to your chilled keg, then rock or shake the keg vigorously for 5-10 minutes. Re pressurize if needed and repeat. Check after 30 minutes to avoid over-carbonation. Vent and sample until you reach your target carbonation level.
Why is my keg beer foaming?
Foam is usually caused by warm temperature, insufficient line length, or sudden pressure changes. Keep your beer at serving temperature (38-42F for ales). Use at least 3 feet of 3/16 inch beer line to create enough restriction. Open the tap slowly rather than all at once. Check for leaks or pressure spikes that might be causing turbulence.
How do I transfer beer to a keg without oxidation?
Minimize oxidation by purging the empty keg with CO2 before transfer. Connect gas to the empty keg at 5-10 PSI and let it flush through for 10-15 seconds. Transfer slowly using gravity, placing the fermenter above the keg. Do not agitate or splash the beer. Work methodically and take 10-15 minutes rather than rushing.
Conclusion
This Homebrewing Kegging Guide covered the essentials you need to start kegging your homebrew. You learned about the equipment, how ball-lock and pin-lock kegs work, proper cleaning and sanitization, CO2 setup, carbonation methods, and how to troubleshoot common issues.
Kegging is a game-changer for homebrewers who are tired of the bottling grind. The upfront investment is higher, but the time savings on every batch make it worthwhile if you brew regularly. Your beer will be consistently carbonated, easier to serve, and ready to drink without the wait that bottle conditioning requires.
Start with one keg and a basic CO2 setup. Master the Set-N-Wait method for carbonation, keep your equipment clean, and you will be pouring draft homebrew within a few weeks. The community forums have decades of collective experience to help you when you hit snags. Welcome to the world of draft homebrew.