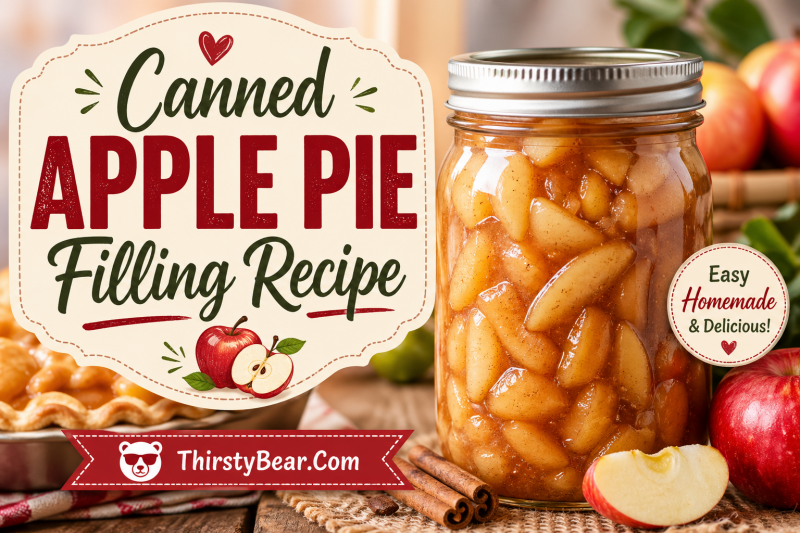
Nothing beats pulling a jar of homemade canned apple pie filling recipe from your pantry during the busy holiday season. After 15 years of canning apples every fall, I have perfected a method that gives you shelf-stable, ready-to-use filling that tastes better than anything from the store. This recipe yields about 7 quarts of golden, cinnamon-spiced filling using ClearJel as the safe thickening agent. Whether you have a backyard apple tree or scored a deal at the farmers market, learning to can apple pie filling will save you money and time when pie cravings strike.
I started canning apple pie filling after getting tired of store-bought versions that tasted flat and overly sweet. Now my pantry stays stocked from October through the following year, and I can throw together a fresh apple pie in under 10 minutes. The water bath canning method I share here follows USDA guidelines and requires no special pressure canner. Let me walk you through everything I have learned about making safe, delicious canned apple pie filling at home.
Table of Contents
Why Can Your Own Apple Pie Filling?
Canning your own apple pie filling puts you in complete control of ingredients and sweetness levels. You can adjust the spices to your taste, use organic apples, and skip the preservatives found in commercial products.
Each quart jar costs roughly $3-4 to make at home compared to $6-8 for quality store-bought filling. A typical batch yielding 7 quarts saves you $20-30 while delivering superior flavor.
Having jars ready in your pantry means dessert emergencies are handled. Unexpected guests, holiday potlucks, or sudden pie cravings require zero prep time. Just open a jar, pour into a crust, and bake.
Canned Apple Pie Filling Ingredients
This recipe makes approximately 7 quarts of filling. You will need 6 quarts of peeled, cored, and sliced apples (about 24-30 medium apples), 5-1/2 cups white granulated sugar, 1-1/2 cups brown sugar, 1-1/2 cups ClearJel cook-type starch, 1 tablespoon ground cinnamon, 1 teaspoon ground nutmeg, 2-1/2 teaspoons kosher salt, and 3 tablespoons bottled lemon juice.
You will also need 10 cups of water for the syrup base. Some canners add a few drops of yellow food coloring for that classic golden look, though this is completely optional.
The lemon juice serves a critical purpose beyond flavor. It maintains the acidity level needed for safe water bath canning. Always use bottled lemon juice with standardized acidity rather than fresh lemons.
Equipment You Will Need
Water bath canning requires specific equipment for safety and success. You need a water bath canner or large stockpot with a rack that keeps jars off the bottom.
Gather 7 quart-size mason jars with new lids and rings, a jar lifter for safely removing hot jars, a lid lifter or magnetic tool, a bubble remover and headspace measuring tool, a canning funnel, a large pot for making syrup, a sharp knife and peeler, and clean towels.
Check all jars for chips or cracks before starting. Even tiny imperfections can prevent proper sealing.
Best Apple Varieties for Canning
Not all apples hold up equally well during canning. You want varieties that maintain their shape and provide good flavor balance.
Granny Smith apples are the gold standard for pie filling. Their tartness balances the sugar, and they stay firm during processing.
Fuji and Honeycrisp add sweetness and excellent texture. Many experienced canners use a mix of tart and sweet apples for complex flavor.
Other reliable choices include Gala for sweetness, Jonagold for balanced flavor, and Braeburn for spice notes. Avoid Red Delicious and other soft varieties that turn mushy.
Can you use frozen apples? Yes, with proper preparation. Thaw completely and drain excess liquid before starting. The texture will be softer than fresh, but the results are still excellent.
ClearJel vs Cornstarch: Why It Matters
ClearJel is a modified cornstarch specifically formulated for canning. Unlike regular cornstarch, it maintains its thickening power through the high heat of water bath processing and extended storage.
Never use regular cornstarch or flour in canned apple pie filling. These thickeners break down during processing, leaving you with runny, unappetizing filling that may separate in the jar.
There are two types of ClearJel: cook-type and instant. For this recipe, you need cook-type ClearJel. The instant variety dissolves without heat and will not work properly in this application.
Finding ClearJel can be tricky. Check Amish bulk food stores, online retailers like Amazon, or specialty canning suppliers. A 1-pound bag costs $8-12 and lasts multiple batches.
If you cannot find ClearJel, you have two options. First, can the apple slices in syrup without any thickener, then add cornstarch when you open the jar to bake. Second, freeze your apple pie filling instead of canning it.
How to Can Apple Pie Filling
Follow these steps carefully for safe, shelf-stable results. Read through completely before starting.
Step 1: Prepare Your Jars and Equipment
Wash all jars, lids, and rings in hot soapy water. Rinse well. Place jars in your water bath canner filled with warm water and bring to a simmer to sterilize. Keep jars hot until ready to fill.
Warming the jars prevents thermal shock when you add hot filling. This reduces breakage risk significantly.
Step 2: Prepare the Apples
Peel, core, and slice your apples into uniform 1/4-inch slices. Uniformity ensures even cooking and attractive jars.
Place sliced apples in a bowl of water with lemon juice to prevent browning while you work.
Step 3: Blanch the Apples (Critical Step)
Bring a large pot of water to boil. Working in batches, blanch apple slices for 1 minute. Drain and keep warm.
Blanching is essential for preventing siphoning during processing. Siphoning occurs when liquid escapes the jar, compromising your seal.
Step 4: Make the Syrup
In a large pot, combine water, both sugars, ClearJel, cinnamon, nutmeg, and salt. Whisk until smooth.
Heat over medium-high heat, stirring constantly, until the mixture thickens and bubbles. This takes 5-8 minutes. Once bubbling, cook for 1 additional minute, then remove from heat. Stir in lemon juice.
The syrup will be thick and glossy. If it seems too thick, add 1/2 cup water.
Step 5: Pack the Jars
Working with one jar at a time, remove a hot jar from the canner. Place it on a towel.
Pack hot apple slices into the jar, leaving 1-1/4 inches headspace at the top. Press apples down gently to pack tightly.
Ladle hot syrup over the apples, maintaining 1-1/4 inches headspace. Headspace is the empty space between the filling and the rim.
Use a bubble remover tool to release trapped air bubbles. Add more syrup if needed to maintain proper headspace.
Step 6: Seal the Jars
Wipe the jar rim clean with a damp cloth. Any syrup residue prevents proper sealing.
Place a new lid on the jar. Screw on the ring until finger-tip tight. This means snug but not cranked down hard.
Over-tightening rings prevents air from escaping during processing, which can cause seal failure.
Step 7: Process in Water Bath
Place filled jars on the rack in your canner. Lower into the water. Water must cover jars by 1-2 inches.
Bring water to a full rolling boil. Start timing when boiling begins.
Process quarts for 25 minutes at sea level to 1,000 feet elevation. Add 5 minutes for 1,001-3,000 feet. Add 10 minutes for 3,001-6,000 feet. Add 15 minutes for above 6,000 feet.
Keep water boiling vigorously throughout processing. Add boiling water if level drops.
Step 8: Cool and Check Seals
Turn off heat when processing time is complete. Remove canner lid. Wait 5 minutes before removing jars.
Lift jars straight up with jar lifter. Place on a towel-lined counter with 2 inches space between them. Do not tilt or wipe.
Let cool undisturbed for 12-24 hours. You will hear satisfying pops as lids seal.
After cooling, check seals by pressing centers. Lids should not flex up and down. Remove rings and try to lift lids with fingertips. Properly sealed lids resist removal.
Label jars with contents and date. Store in a cool, dark place.
Water Bath Canning Safety Guidelines
Water bath canning is safe for apple pie filling because apples are naturally acidic, especially with added lemon juice. This acidity prevents botulism growth.
Always use tested recipes like this one. Do not alter ingredient ratios, especially lemon juice and sugar amounts. These affect both safety and preservation quality.
Processing times must be followed exactly based on your altitude. Under-processing leads to spoilage. Over-processing damages texture.
Never reuse canning lids for new processing. Rings can be reused indefinitely if not rusted or bent.
Troubleshooting Common Problems
Even experienced canners encounter issues. Here is how to fix the most common problems.
Jars Not Sealing
If jars do not seal within 24 hours, check for these causes. Nicks on jar rim, food residue on rim, improper headspace, or damaged lid sealing compound.
You can reprocess unsealed jars within 24 hours. Remove the lid, check rim, add new lid, and process full time again. Alternatively, refrigerate and use within 2 weeks.
Siphoning (Liquid Loss)
Siphoning happens when liquid escapes during processing. It looks like syrup leaked out and filling level dropped below the liquid line.
Prevention is key. Always blanch apples. Maintain proper headspace. Avoid over-tightening rings. Let jars rest 5 minutes in canner before removing.
Jars with minor siphoning are still safe if properly sealed. Just use those first. Heavy siphoning exposing food requires immediate refrigeration.
Syrup Not Thickening
Runny filling usually means insufficient ClearJel or undercooked syrup. Measure ClearJel carefully by volume, not weight. Cook syrup until it visibly thickens before adding lemon juice.
Sometimes filling thickens during storage. Check consistency before using.
Storage and Shelf Life
Properly canned and sealed apple pie filling lasts 12-24 months stored in a cool, dark place. I have successfully used jars after 2 years with no quality loss.
Store jars without rings. This allows you to spot any seal breaks or spoilage immediately.
Check jars before use. Look for broken seals, bulging lids, leaking, off-odors, or mold. When in doubt, throw it out.
Once opened, refrigerate and use within 1 week. Do not re-can opened jars.
Creative Uses for Canned Apple Pie Filling
Your homemade filling goes way beyond traditional pie.
- Breakfast applications: Top oatmeal, pancakes, or waffles. Swirl into yogurt or cottage cheese. Spread on toast with cream cheese.
- Dessert variations: Make apple crisp by adding oats and butter topping. Layer into parfaits with whipped cream. Top cheesecake or ice cream. Fill hand pies or turnovers.
- Creative uses: Blend into smoothies. Mix with granola for quick dessert. Use as a crepe filling. Stir into muffin batter.
A jar also makes an excellent hostess gift tied with ribbon and a printed recipe card.
Pro Tips for Perfect Results
After hundreds of jars, these tips have saved me time and prevented failures.
Invest in an apple peeler-corer-slicer tool. It processes 30 apples in 10 minutes versus an hour by hand.
Work in assembly-line fashion. Prepare all apples before starting syrup. Syrup thickens quickly and needs immediate attention once ready.
Keep a kettle of boiling water ready to top off the canner if water level drops during processing.
Label jars with the apple variety used. This helps you replicate favorites.
Double-check your altitude before starting. Processing times vary significantly.
FAQs
What can I use canned apple pie filling for?
Canned apple pie filling works for traditional pies, Dutch apple pie, apple crisp, cobbler, and crumbles. Beyond baking, use it as an oatmeal topping, ice cream topping, pancake and waffle topping, cheesecake topping, or crepe filling. You can also make hand pies, fry pies, parfaits with whipped cream, or mix into muffin batter for apple muffins.
Can I use cornstarch instead of ClearJel?
No. Regular cornstarch breaks down during the high heat of water bath canning and long-term storage, leaving you with runny filling. ClearJel is a modified cornstarch specifically formulated for canning that maintains thickening power. If you cannot find ClearJel, can apples in syrup without thickener and add cornstarch when you open the jar to bake, or freeze the filling instead.
How long does canned apple pie filling last?
Properly canned and sealed apple pie filling stored in a cool, dark place lasts 12 to 24 months. Some home canners report success using jars up to 2 years old. Always check seals before use and inspect for any signs of spoilage including bulging lids, leaking, off-odors, or mold. Once opened, refrigerate and use within 1 week.
Do I need a pressure canner for apple pie filling?
No. Apple pie filling is safely processed in a water bath canner because apples are naturally acidic, especially with the added lemon juice in tested recipes. This acidity prevents botulism growth. You only need a pressure canner for low-acid foods like vegetables, meats, and broths. Follow water bath processing times exactly based on your altitude.
Can I use frozen apples for canning pie filling?
Yes, you can use frozen apples. Thaw them completely and drain excess liquid before starting. The texture will be softer than fresh apples, but the results are still excellent. Blanch the thawed apples as directed in the recipe to prevent siphoning during processing. Do not refreeze apples after canning.
Why did my jars not seal?
Failed seals usually result from nicks on the jar rim, food residue left on the rim, improper headspace, over-tightened or loose rings, or damaged lid sealing compound. You can reprocess unsealed jars within 24 hours using new lids. Check rims for cracks, wipe clean, adjust headspace to 1-1/4 inches, and process full time again.
How do I prevent siphoning when canning apple pie filling?
Siphoning occurs when liquid escapes jars during processing. Prevent it by blanching apples for 1 minute before packing, maintaining exactly 1-1/4 inches headspace, tightening rings only finger-tip tight, and letting jars rest in the canner for 5 minutes after processing before removing. Do not tilt jars when lifting them out.
Conclusion
Mastering a canned apple pie filling recipe gives you year-round access to homemade dessert convenience. The upfront effort of a weekend canning session pays dividends when you can produce a fresh apple pie in minutes during the busy holiday season.
Start with quality apples, follow the ClearJel and water bath method exactly, and pay attention to headspace and processing times. The troubleshooting tips here will help you avoid the common pitfalls that frustrate new canners.
Have you tried canning apple pie filling before? Share your experience in the comments below. And if you found this guide helpful, check out our other home canning recipes to stock your pantry with homemade goodness.