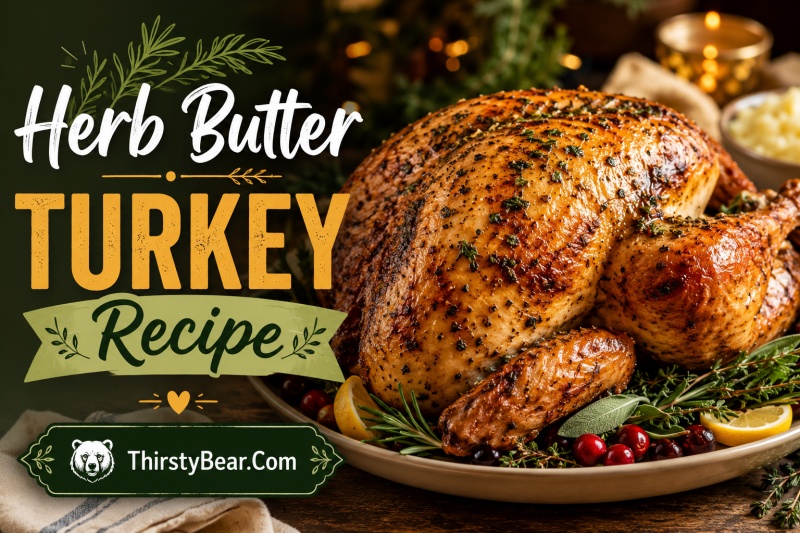
If you have ever carved into a roasted turkey only to find dry, stringy meat beneath golden skin, you are not alone. That disappointment is exactly why I started using this herb butter turkey recipe years ago, and it has transformed every holiday meal since. The secret is not a complicated brine or constant basting, it is a simple compound butter applied directly under the turkey skin where it matters most.
This recipe for herb butter turkey gives you moist, flavorful meat with crispy, herb-crusted skin without the fuss of traditional methods. You will learn exactly how to make the compound butter, how to get it under the skin without tearing, and the roasting technique that delivers perfect results every time. Whether you are preparing your first Thanksgiving turkey or looking to upgrade your holiday centerpiece, this guide has everything you need.
Table of Contents
Why This Herb Butter Turkey Recipe Works
The magic of this technique comes down to where the butter goes. When you spread herb butter directly on the meat under the skin, it melts into the breast and legs as the turkey roasts. This bastes the meat from the inside out, keeping it juicy while the herbs and garlic infuse deep into the flesh.
I learned this from experienced cooks in online forums who swear by the method. The compound butter seasons the actual meat, not just the surface, one user explained after years of testing different approaches. Another home cook shared that mixing herb butter with a little bacon grease adds even more flavor, though the basic recipe is exceptional on its own.
The result is turkey that stays moist even if you slightly overcook it, with skin that turns crispy and golden thanks to the fat content. You eliminate the need for brining, which takes up refrigerator space for days, and you can skip basting entirely because the butter does the work for you.
Ingredients for Herb Butter Turkey
Quality ingredients make the difference between good turkey and unforgettable turkey. You will need unsalted butter so you can control the salt level, fresh herbs for the brightest flavor, and a few aromatics to round everything out.
For the Compound Butter
- 1 cup (2 sticks) unsalted butter, softened to room temperature
- 3 tablespoons fresh rosemary, finely chopped
- 3 tablespoons fresh thyme leaves, stripped from stems
- 3 tablespoons fresh sage, finely chopped
- 6 cloves garlic, minced or pressed
- 1 teaspoon kosher salt
- 1/2 teaspoon freshly ground black pepper
- 1 tablespoon fresh lemon zest (optional but recommended)
For the Turkey
- 1 whole turkey, 12 to 16 pounds (thawed if frozen)
- 1 medium onion, quartered
- 1 lemon, halved
- 4 cloves garlic, smashed
- Additional fresh herb sprigs (rosemary, thyme, sage) for cavity
- 2 tablespoons olive oil or melted butter (for exterior)
- Coarse salt and freshly ground pepper for seasoning
Dried Herb Substitutions
If fresh herbs are unavailable, you can substitute dried herbs using a 3-to-1 ratio. That means 1 teaspoon of dried herbs for every 1 tablespoon of fresh. Use 1 tablespoon each of dried rosemary, thyme, and sage, and crush them between your palms before mixing to release their oils.
Equipment You Will Need
You do not need fancy equipment for this recipe, but a few key tools make the process easier and safer. Gather these items before you start to keep things organized.
- Roasting pan with rack (V-rack or flat rack both work)
- Instant-read meat thermometer (essential for food safety)
- Medium mixing bowl for compound butter
- Small spoon or butter knife for loosening skin
- Kitchen twine for trussing (optional but recommended)
- Aluminum foil for tenting
- Cutting board and sharp carving knife
How to Make Herb Butter Turkey: Step-by-Step
Follow these eight steps in order, and you will have a perfectly roasted turkey that impresses everyone at your table. I have tested this method over a dozen holiday meals, and the results are consistently excellent.
Step 1: Make the Herb Butter
Start by letting your butter sit at room temperature for about 30 minutes until it is soft and easily spreadable. If you forgot to take it out early, you can microwave it in 5-second bursts, but be careful not to melt it.
In a medium bowl, combine the softened butter with all the chopped herbs, minced garlic, salt, pepper, and lemon zest if using. Use a fork or wooden spoon to mash everything together until evenly distributed. The mixture should be vibrant green and highly fragrant.
You can make this compound butter up to 3 days ahead and store it in the refrigerator. Let it soften again before applying to the turkey, or you will have trouble spreading it evenly.
Step 2: Prepare the Turkey
Remove your turkey from the refrigerator 1 hour before roasting to take the chill off. A room-temperature turkey cooks more evenly than a cold one going straight from fridge to oven. Remove the giblets and neck from the cavity and save them for gravy if desired.
Pat the turkey completely dry inside and out with paper towels. This is crucial for crispy skin. Any moisture left on the surface will steam the skin instead of letting it brown and crisp. Do not skip this step even if you are in a hurry.
Step 3: Loosen the Skin (Critical Technique)
Here is where many first-timers get nervous, but I promise it is easier than it looks. The goal is to create a pocket between the skin and meat without tearing the skin.
Start at the cavity opening and gently slide your fingers or a small spoon between the skin and breast meat. Work slowly toward the neck, separating the membrane that connects skin to meat. Be especially careful around the breastbone where the skin is thinnest.
Do the same for the legs and thighs by working from the thigh cavity outward. You want as much surface area separated as possible so the butter can reach all the meat. A forum user once advised me to think of it like putting on a glove, you are just creating space without removing anything.
Step 4: Apply Herb Butter Under the Skin
Take about two-thirds of your compound butter and work it under the skin of the breast. Place small dollops in different spots and massage from the outside to spread them evenly. You should see the butter distributed across the entire breast area.
Repeat with the remaining butter for the legs and thighs. Some people prefer to use a spoon for this part, but I find clean hands work best because you can feel exactly where the butter is going. Do not worry about getting every spot perfect, the butter will melt and distribute during roasting.
Save any leftover butter for rubbing on the exterior or for making gravy later. You can also freeze it for next time.
Step 5: Stuff the Cavity
Stuff the turkey cavity with the quartered onion, halved lemon, smashed garlic cloves, and a few fresh herb sprigs. These aromatics steam from the inside during roasting, adding another layer of flavor to the meat.
Do not pack the cavity too tightly. You want some air circulation so heat can penetrate and cook the turkey evenly. If the cavity is overstuffed, the innermost areas may not reach safe temperature.
Step 6: Truss and Season the Exterior
Tuck the wing tips behind the turkey’s back so they do not burn. Tie the legs together with kitchen twine if you like the traditional look, though it is not strictly necessary for cooking. I usually truss because it makes the turkey easier to move and carve.
Rub the outside of the turkey with olive oil or melted butter, then sprinkle generously with salt and pepper. This helps the skin brown beautifully and adds seasoning to every bite.
Step 7: Roast to Perfection
Preheat your oven to 425 degrees Fahrenheit. Place the turkey breast-side up on a rack in your roasting pan. The rack elevates the turkey so air circulates underneath and the bottom does not stew in juices.
Roast at 425F for the first 30 minutes to jump-start the browning, then reduce heat to 325F for the remainder of the cooking time. This high-heat start is the trick many restaurants use for that magazine-cover golden color.
Do not open the oven door repeatedly to check on the turkey. Every peek drops the temperature and extends cooking time. Set a timer and trust the process.
Step 8: Rest Before Carving
When the internal temperature reaches 165 degrees Fahrenheit in the thickest part of the thigh (not touching bone), remove the turkey from the oven. Transfer it to a cutting board and tent loosely with foil.
Let the turkey rest for 30 to 45 minutes before carving. This resting period is non-negotiable. During roasting, the juices are pushed toward the surface. Resting allows them to redistribute back into the meat fibers. Carve too soon and all those juices run out onto your cutting board instead of staying in the meat where they belong.
The turkey will stay warm under the foil tent, and the internal temperature will actually rise a few degrees during this time. Use the resting period to make gravy and finish your side dishes.
Roasting Time and Temperature Guide
Knowing exactly when your turkey will be done helps you coordinate the rest of your meal. These times are estimates for a turkey roasted at 325F after the initial 30-minute high-heat blast. Always use a meat thermometer to confirm doneness rather than relying solely on time.
For a 6 to 8 pound turkey breast, plan 1 hour 15 minutes to 1 hour 45 minutes. An 8 to 12 pound whole turkey needs 1 hour 45 minutes to 2 hours 45 minutes. A 12 to 14 pound turkey requires 2 hours 45 minutes to 3 hours 15 minutes. For a 14 to 18 pound bird, budget 3 hours 15 minutes to 3 hours 45 minutes. An 18 to 20 pound turkey takes 3 hours 45 minutes to 4 hours 15 minutes.
Add 15 to 30 minutes if your turkey is stuffed with traditional bread stuffing. The safest approach is to check the temperature early and often once you are within the estimated window. Remember that every oven is slightly different, and factors like pan material and whether you use a convection setting affect timing.
Tips for the Best Results
After years of making this recipe, I have collected some tips that take the results from good to exceptional. These small details make a noticeable difference.
Getting Crispy Skin
Start with a completely dry turkey surface. Pat it dry and let it air-dry in the refrigerator uncovered overnight if you have time. The high-heat start at 425F is essential for initial browning. If the skin is browning too quickly before the meat is cooked through, tent the breast loosely with foil.
Preventing Dry Meat
Do not overcook. The safe internal temperature is 165F, but the turkey continues cooking during resting. Pull it at 160F if you want, and it will reach 165F while resting. Trust your thermometer, not the pop-up timer that comes with some turkeys, which often triggers when the bird is already overcooked.
Make-Ahead Strategy
You can prepare the compound butter up to 3 days ahead and refrigerate it, or freeze it for up to 3 months. You can also loosen the turkey skin and apply the butter the night before roasting. Just cover the turkey tightly and refrigerate. Let it sit at room temperature for 1 hour before going into the oven.
Carving for Presentation
Remove the entire breast in one piece by cutting along the breastbone, then slice against the grain on your cutting board. This gives you more even slices than trying to carve directly off the bird. Separate the legs and thighs at the joint for easier serving.
Troubleshooting Common Problems
Even experienced cooks encounter issues sometimes. Here is how to handle the most common turkey problems.
If the skin tears while you are loosening it, do not panic. The turkey will still cook beautifully, and you can patch small tears with butter to help them seal. For butter that seems to slide out during roasting, make sure you are massaging it evenly under the skin and not overpacking any one area.
If your turkey is browning too fast on top but the thighs are not done, tent the breast with foil and continue roasting. If you have an unevenly cooking bird, check that your oven rack is level and that air can circulate around the turkey.
For a turkey that seems to be taking much longer than expected, verify your oven temperature with a separate thermometer. Many home ovens run hot or cold, and knowing your oven’s quirks helps you adjust accordingly.
Wine Pairing and Side Dish Suggestions
A herb butter turkey deserves thoughtful accompaniments. The richness of the butter and the aromatic herbs pair beautifully with a classic Chardonnay. Check out our Chardonnay pairing recommendations for specific bottles that complement roasted poultry.
For side dishes, consider classic combinations that do not compete with the turkey’s flavors. Creamy mashed potatoes, roasted root vegetables, green beans with almonds, and a tart cranberry sauce all balance the richness of the herb butter. A simple arugula salad with lemon vinaigrette cuts through the heaviness of the meal.
If you have leftover turkey after the main meal, transform it into delicious party appetizer recipes for the next day. Turkey sliders, mini pot pies, or stuffed mushrooms are always crowd-pleasers.
Frequently Asked Questions
What herbs are good in butter for turkey?
What does putting butter under the skin of a turkey do?
Which herb is best for turkey?
What is the secret to a moist turkey?
Can I use dried herbs instead of fresh?
How far in advance can I make the herb butter?
Should I brine the turkey if using herb butter?
Conclusion
This herb butter turkey recipe delivers everything you want in a holiday centerpiece: moist, flavorful meat, crispy golden skin, and an aroma that fills your kitchen with anticipation. The technique of applying compound butter under the skin eliminates the need for complicated brining or constant basting while producing superior results.
I have served this turkey to family and friends for years, and the response is always the same: requests for the recipe and compliments on how juicy the meat tastes. Once you try this method, you will never go back to plain roasted turkey again.
For more holiday meal planning ideas, including timing your entire menu and coordinating multiple dishes, explore our balanced family meal plans. Here is to your best turkey yet in 2026.