I still remember the first time I tasted real Thai yellow curry made from scratch. It was at a tiny family-run restaurant in Chiang Mai, and the depth of flavor was unlike anything I had ever experienced from a jar. That moment sparked my obsession with creating an authentic yellow curry vegan paste recipe that captures those same golden, aromatic qualities without any animal products.
For years, I relied on store-bought pastes. They were convenient, but something always felt missing. After 2026 trips to Asian markets and countless test batches in my kitchen, I finally cracked the code. This recipe delivers that restaurant-quality flavor using entirely plant-based ingredients. You will taste the difference immediately.
Whether you are a committed vegan or simply looking to expand your cooking repertoire, this guide will walk you through everything you need to know. We will cover sourcing ingredients, traditional techniques, and how to turn your homemade paste into a complete curry that rivals your favorite Thai restaurant.
Table of Contents
What is Thai Yellow Curry
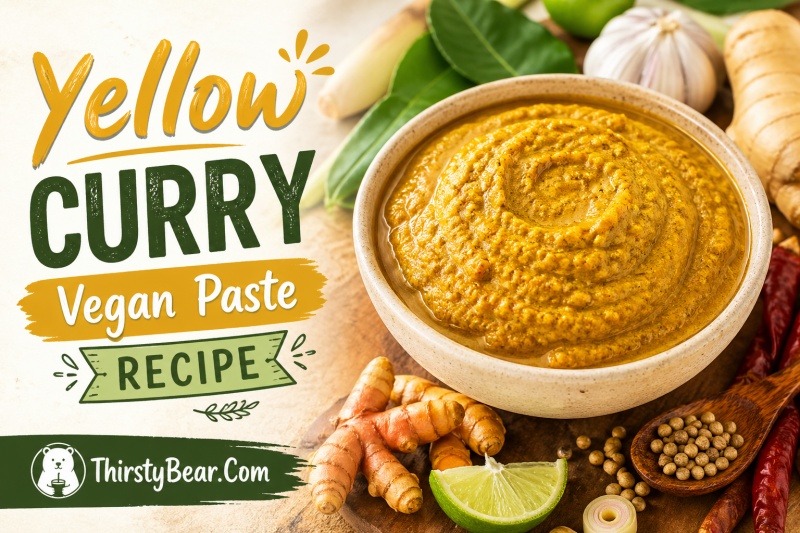
Thai yellow curry paste, known in Thai as prik gang garee, is a fragrant blend of aromatics and spices that forms the foundation of one of Thailand’s most beloved curries. Unlike its spicier cousins, yellow curry sits in the middle of the heat spectrum with a warm, mellow character that lets the turmeric and coconut milk shine.
The distinctive golden color comes from turmeric, often fresh turmeric root when available. This gives the curry its signature sunny hue and earthy base notes. Traditional recipes call for shrimp paste for umami depth, but we will replace that with equally savory vegan alternatives.
Yellow curry is typically the mildest of the Thai curry family, making it perfect for those who prefer flavor over fire. The addition of coconut milk creates a luxurious, creamy sauce that pairs beautifully with potatoes, tofu, and vegetables.
How Yellow Curry Compares to Red and Green
Understanding the differences helps you choose the right curry for your meal. Here is how the three main Thai curries stack up:
| Curry Type | Main Chilies | Heat Level | Key Spices | Color Source |
|---|---|---|---|---|
| Yellow Curry | Dried red, bird’s eye | Mild to medium | Turmeric, cumin, coriander | Turmeric |
| Red Curry | Dried red chilies | Medium to hot | Cumin, coriander, pepper | Red chilies |
| Green Curry | Fresh green chilies | Hot | Cumin, coriander, Thai basil | Green chilies, basil |
Yellow curry’s milder profile makes it the most versatile for family meals. Children and spice-sensitive guests can enjoy it without reaching for water, while chili lovers can always add fresh bird’s eye chilies at the table.
Essential Ingredients for Homemade Yellow Curry Paste
Authentic Thai curry paste relies on fresh aromatics that might require a trip to an Asian grocery store. Do not substitute dried versions where fresh is specified. The flavor difference is dramatic.
The Aromatic Base
These ingredients form the soul of your paste:
- Lemongrass: Use only the bottom 4-6 inches of the stalk where it is pale and tender. Remove the tough outer layers and slice thinly. You need about 3 stalks, yielding roughly 1/3 cup when chopped.
- Galangal: Often called Thai ginger, galangal has a sharper, more pine-like flavor than regular ginger. Peel and slice about 2 tablespoons. If you absolutely cannot find galangal, young ginger is an acceptable substitute but the flavor will differ slightly.
- Kaffir Lime Leaves: These fragrant leaves add a distinctive citrus note that cannot be replicated. Remove the central stem and tear or chop the leaves finely. You will need 6-8 leaves.
- Garlic and Shallots: Use 6 cloves of garlic and 4-5 Asian shallots (or 2 large European shallots). Shallots provide sweetness that onions lack.
Spices and Seasonings
These ground spices build complexity:
- Turmeric: Use 1 tablespoon of ground turmeric or 2 tablespoons of fresh turmeric if you can find it. Fresh turmeric stains everything it touches, so wear gloves and use a dedicated cutting board.
- Cumin and Coriander: Toast 1 tablespoon each of cumin seeds and coriander seeds in a dry pan until fragrant, then grind. Whole seeds toasted yourself release far more aroma than pre-ground spices.
- White Pepper: Use 1 teaspoon of freshly ground white pepper. It provides heat without the harshness of black pepper.
- Curry Powder: Add 1 tablespoon of mild curry powder for extra depth. Madras curry powder works beautifully here.
Vegan Substitutes for Shrimp Paste
This is where traditional recipes and vegan versions diverge. Shrimp paste adds salty, fermented umami that seems irreplaceable. I have tested every alternative, and here are the best options:
- White Miso Paste: This is my top choice. Use 1 tablespoon of white miso for that fermented depth. It brings the same savory funk without any seafood.
- Soy Sauce or Tamari: Use 2 tablespoons of good quality soy sauce. For gluten-free versions, tamari works perfectly.
- Mushroom Powder: Add 1 teaspoon of dried shiitake mushroom powder for extra savory notes. You can make this by grinding dried shiitakes in a spice grinder.
- Seaweed: A small piece of kombu or a teaspoon of dulse flakes adds oceanic notes that mimic the original.
Sweeteners and Chilies
- Palm Sugar: Use 2 tablespoons of grated palm sugar or 1 tablespoon of brown sugar. Palm sugar has a caramel depth that white sugar lacks.
- Bird’s Eye Chilies: Use 3-5 fresh or dried red chilies for medium heat. Remove seeds for milder paste, or add extra for fire. You can also use 1 teaspoon of dried chili flakes in a pinch.
Equipment You’ll Need
You have two options for making your paste, and both yield excellent results:
- Food Processor Method: A standard food processor works for modern home cooks. You will need to scrape down the sides frequently and process longer than you might expect to achieve a smooth paste.
- Pestle and Mortar: The traditional method uses a stone mortar (thai: krok) and wooden pestle. This takes more time and physical effort but produces the most aromatic paste as the pounding releases essential oils.
- Storage Jars: Have sterilized glass jars ready. A 16-ounce mason jar holds one batch perfectly. Sterilize by boiling the jar and lid for 10 minutes, then letting them air dry.
How to Make Yellow Curry Vegan Paste Recipe
This is the complete method for making your paste using a food processor. I will cover the traditional pestle and mortar technique in the next section for those who want the most authentic experience.
One batch makes approximately 1.5 cups of paste, enough for 4-6 curries depending on how strong you like your flavors.
Step 1: Prepare all your aromatics. Trim and slice the lemongrass, peel and chop the galangal, and remove stems from the kaffir lime leaves. Peel the garlic and shallots. The more you chop everything now, the easier your processor’s job will be.
Step 2: Toast your whole spices. Heat a dry skillet over medium heat and add the cumin and coriander seeds. Shake the pan constantly for 2-3 minutes until they smell incredibly fragrant. Remove immediately to prevent burning. Let cool, then grind to a fine powder in a spice grinder or with a mortar.
Step 3: Begin processing the tough aromatics. Add the lemongrass, galangal, and kaffir lime leaves to your food processor. Pulse 10-15 times, then run continuously for 30 seconds. Scrape down the sides with a spatula.
Step 4: Add the shallots and garlic. These are softer and will help the tougher ingredients break down. Process for another minute, stopping to scrape the sides twice. The mixture should start looking like a rough paste.
Step 5: Add all remaining ingredients. Put in the ground spices, turmeric, white pepper, curry powder, miso paste, soy sauce, palm sugar, and chilies. Process for 2-3 minutes, scraping down every 30 seconds. The paste should become relatively smooth with a thick, spreadable consistency.
Step 6: Taste and adjust. This is your moment to customize. Want it saltier? Add more soy sauce. Need more heat? Add another chili. Prefer it sweeter? A bit more palm sugar. The paste should taste intense and slightly too strong on its own, which is correct since it will be diluted in curry.
Step 7: Transfer to your sterilized jar. Press the paste down firmly to eliminate air pockets. Smooth the top and cover with a thin layer of neutral oil to prevent oxidation. Seal and store.
Traditional Pestle and Mortar Method
For those who want the most authentic experience, the traditional method rewards you with superior texture and aroma. The pounding action releases essential oils in a way that blades cannot replicate.
Step 1: Start with the toughest ingredients. Add your sliced lemongrass to the mortar and pound with the pestle for 3-4 minutes until it breaks down into fibrous strands. This requires more force than you might expect. Use a grinding motion, not just pounding.
Step 2: Add the galangal and pound for another 3 minutes. The goal is to break down the cell walls and release the aromatic oils. You should smell the galangal becoming stronger as you work.
Step 3: Add the kaffir lime leaves and continue pounding for 2 minutes. The leaves will break down faster than the woody stalks.
Step 4: Add the shallots and garlic. These softer ingredients will help bind everything together. Pound and grind for 4-5 minutes until you have a relatively smooth paste.
Step 5: Add your ground spices, turmeric, miso, soy sauce, sugar, and chilies. Pound for another 2-3 minutes until everything is fully incorporated. The final paste should be smooth enough to spread but still have some texture.
The entire process takes about 20 minutes of active pounding. Your arm will feel it, but the fragrance filling your kitchen makes every minute worthwhile.
Turning Your Paste Into a Complete Curry
Now that you have your homemade paste, let us transform it into a full meal. This recipe serves 4 people generously and takes about 30 minutes from start to finish.
The ratio that never fails me is 1/3 cup of curry paste to one 14-ounce can of full-fat coconut milk. This creates a sauce that coats without overwhelming.
Step 1: Prepare your protein and vegetables. Press 14 ounces of firm tofu for 15 minutes to remove excess water, then cut into 1-inch cubes. Peel and cube 2 medium Yukon Gold potatoes into 3/4-inch pieces. Chop 1 red bell pepper and 1 cup of green beans into bite-sized pieces. Set everything aside.
Step 2: Heat 2 tablespoons of coconut oil in a large pot or Dutch oven over medium-high heat. Add your tofu cubes in a single layer. Let them sear undisturbed for 3 minutes until golden, then flip and cook another 2 minutes. Remove the tofu and set aside.
Step 3: In the same pot, add 1/3 cup of your homemade curry paste. Fry it for 2-3 minutes until it becomes fragrant and starts to darken slightly. This step is crucial. Raw curry paste tastes harsh. Fried paste blooms into something magical.
Step 4: Add the potatoes and stir to coat with the paste. Cook for 2 minutes, then pour in one 14-ounce can of full-fat coconut milk and 1/2 cup of vegetable broth. Bring to a gentle simmer. Do not let it boil vigorously or the coconut milk might separate.
Step 5: Add 1 tablespoon of soy sauce and 1 teaspoon of palm sugar. Stir to dissolve. Cover and simmer for 15 minutes until the potatoes are almost tender.
Step 6: Add the bell pepper, green beans, and reserved tofu. Simmer uncovered for another 8-10 minutes until the vegetables are tender but still have some bite.
Step 7: Taste and adjust the seasoning. Add more soy sauce for salt, sugar for sweetness, or lime juice for brightness. The curry should taste balanced with no single element dominating.
Step 8: Just before serving, stir in a handful of Thai basil leaves and a squeeze of fresh lime juice. The basil will wilt into the curry, releasing its anise notes.
Serve immediately over jasmine rice. The contrast between the warm, creamy curry and the fluffy rice is what makes this dish so comforting.
Storage and Shelf Life
One of the best parts of making a big batch of paste is having it ready for quick weeknight meals. Here is how to store it properly.
- Refrigerator Storage: Your paste will keep in a sterilized glass jar in the refrigerator for up to 3 weeks. Cover the surface with a thin layer of neutral oil before sealing. This creates an oxygen barrier that prevents mold growth. Always use a clean spoon when scooping.
- Freezer Method: For longer storage, freezing is your best friend. I like to freeze paste in ice cube trays. Each cube is approximately 2 tablespoons, perfect for a single serving of curry. Once frozen solid, pop the cubes into a freezer bag and store for up to 6 months.
- When you need curry paste, just grab the number of cubes your recipe requires. They thaw quickly on the counter or can go straight into a hot pan.
- Signs Your Paste Has Gone Bad: Mold growth, off smells, or significant darkening indicate it is time to discard. If the oil layer on top looks cloudy or smells rancid, the paste has spoiled.
Serving Suggestions
Yellow curry is traditionally served with jasmine rice, but do not stop there. This versatile paste has many applications beyond curry bowls.
Rice Pairings: Jasmine rice is the classic choice. Its floral aroma complements the curry beautifully. Brown rice works well for a heartier meal. For something different, try coconut rice made by cooking jasmine rice in half coconut milk, half water.
Garnishes: Fresh Thai basil leaves, thinly sliced red chilies, crispy fried shallots, and lime wedges add color and freshness. A sprinkle of toasted coconut flakes brings textural contrast.
Other Uses for Your Paste:
Stir-fry: Mix 2 tablespoons of paste with 1/4 cup coconut milk for an instant sauce. Toss with vegetables and tofu.
Marinade: Thin the paste with a little soy sauce and lime juice. Marinate tempeh or vegetables for 30 minutes before grilling.
Soup Base: Add a tablespoon to vegetable broth with coconut milk for a quick curry soup. Add noodles for a complete meal.
Fried Rice: Stir a teaspoon into your fried rice along with the usual seasonings for an aromatic twist.
Pro Tips for the Best Results
After making this curry hundreds of times, I have learned a few tricks that elevate it from good to exceptional.
Press Your Tofu Properly: Water is the enemy of crispy tofu. Wrap your block in clean kitchen towels, place a heavy cast iron skillet on top, and let it press for at least 15 minutes. For extra firmness, freeze the tofu first, then thaw and press. The freezing creates a spongy texture that absorbs sauce beautifully.
Prevent Coconut Milk Separation: Coconut milk separates when boiled too aggressively. Keep your curry at a gentle simmer, not a rolling boil. Full-fat coconut milk is more stable than light versions. Stir occasionally and remove from heat if you see oil beginning to separate.
Adjust Spice Levels: For milder curry, remove all seeds from your chilies and use fewer total chilies. For more heat, add extra bird’s eye chilies or a teaspoon of chili flakes. You can also drizzle chili oil over individual bowls for customizable heat.
Toast Your Spices Fresh: Pre-ground cumin and coriander lose their potency quickly. Whole seeds toasted and ground just before use make a noticeable difference in the final depth of flavor.
Let It Rest: Like many curries, this one tastes even better the next day. The flavors meld and deepen overnight. Make a double batch and enjoy the leftovers for lunch.
Common Mistakes to Avoid: Do not skip frying the paste before adding liquid. Raw paste tastes harsh and one-dimensional. Do not use light coconut milk, which lacks the richness that makes this curry satisfying. Do not overcook your vegetables until they are mushy; they should retain some texture.
Yellow Curry Vegan Paste Recipe FAQ
What is the difference between yellow, red, and green Thai curry paste?
Is Mae Ploy yellow curry paste vegan?
What can I use instead of shrimp paste in Thai curry?
How long does homemade curry paste last in the fridge?
Can I make Thai curry paste without a blender?
What is Thai yellow curry paste called in Thai?
How do you make curry paste milder or spicier?
Final Thoughts
Creating your own yellow curry vegan paste recipe at home opens up a world of flavor that store-bought jars simply cannot match. The process takes time, especially if you choose the traditional pestle and mortar method, but the results reward your patience with aromatic, complex curries that taste authentically Thai.
Once you have this paste in your refrigerator or freezer, a restaurant-quality meal becomes possible any night of the week. The versatility extends beyond curry bowls to stir-fries, marinades, and soups. With practice, you will find yourself adjusting the spice levels and ingredients to match your personal taste perfectly.
Gather your ingredients this weekend and give it a try. Your kitchen will fill with the most incredible fragrance, and your dinner table will feature a curry that rivals anything from your favorite Thai restaurant. The best part? It is entirely vegan, completely customizable, and made with your own hands.